acid wash

Porcelain Tiled Floor Before After Renovation Sidmouth Exeter

Textured Porcelain Floor Tile and Grout Deep Cleaned and Tile Replaced in Sidmouth

We were contacted by a property owner in Sidmouth near Exeter about their Textured Porcelain floor tiles in the kitchen and hallway which needed a deep clean. The tiles themselves were looking grubby and the grout had become stained and darker with ingrained dirt.

Porcelain Kitchen Diner Floor Before Cleaning Repair Sidmouth

There was also a damaged tile that needed replacing which I was happy to do. We often get asked to replace tiles but we don’t really take on tiling work unless it’s part of a bigger renovation project.

I discussed with them the service we offered and gave them a price for the work, which they were happy to proceed with. We arranged a date to complete the work the following month.

Cleaning Textured Porcelain Hallway and Kitchen Floor Tiles

I started by removing all the kickboards from below the kitchen units and then running a bead of clear silicone sealant around the bases. We tend to use a lot of water when cleaning tiles and as most kitchen units are made from MDF we like to prevent any water becoming absorbed into the units. This will prevent them becoming warped by the water so it’s worth taking the time to remove or protect them. I also added protection around the skirting boards.

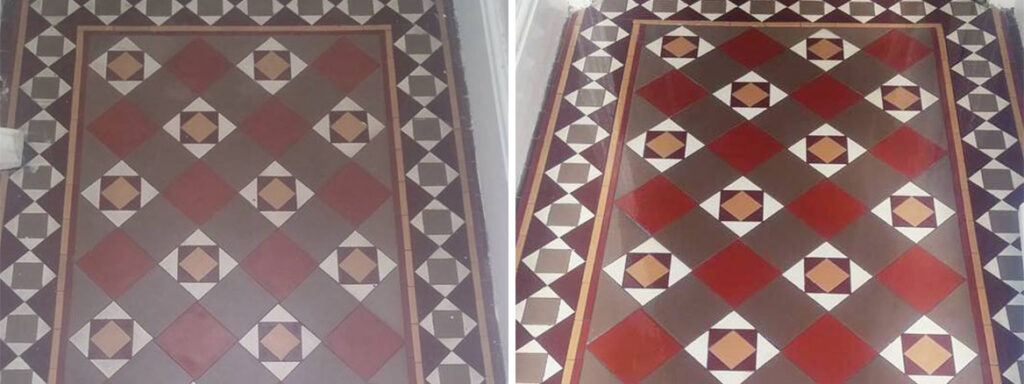
The cleaning process began by spraying Tile Doctor Remove & Go onto the floor, this is an alkaline cleaner designed to remove dirt and other coatings. I left it to soak in for 45 minutes before starting to work it in with a rotary buffer fitted with a black scrubbing pad. The long dwell time gives the product time to digest and loosen the ingrained dirt in the textured tile, dips, and grout lines.

Porcelain Kitchen Diner Floor During Cleaning Sidmouth

After scrubbing the tiles, they were then rinsed with a small amount of water. I used a pressurised truck-mount water vacuum system fitted to my van to extract all the remaining soil and product from the floor.

With the soiling removed the floor was left to air dry (which took an hour or so) before neutralising the floor and removing old grout smears with a diluted acid rinse using Tile Doctor Grout Clean Up. After the rinse floor was given another rinse and once again the waste extracted using the truck-mount system.

After this treatment, the floor was looking so much better and I hadn’t finished.

Replacing a Porcelain Kitchen Tile

Returning the following day, the last step was to remove a broken tile and replace with a new matching tile the client had provided. I always recommend buying more tiles that you need and then keep those extras in the loft or something as you never know when they might come in handy.

To remove the broken tile, I stated by cutting though the grout lines separating it from its neighbours and then carefully breaking the tile up for with a hammer action drill fitted with a chisel bit. The bits of old tile were removed and what was left of the grout was removed using a small Grout-Out tool.

Porcelain Kitchen Diner Floor During Tile Replacement Sidmouth Porcelain Kitchen Diner Floor During Tile Removed Sidmouth

You have to be careful when doing this sort of work as many modern kitchen floors are installed with an electric heating matt which is easily destroyed when lifting a tile. In this case there was no matt under the tile but to my surprise the was another tile so it was clear that the tiler had simply tiled over an existing tiled floor. I hear this is a popular thing to do as a tiled floor usually makes a good base.

With the area cleaned up, it was simply a case of applying fresh rapid setting adhesive and fitting the new tile in place. Once the adhesive had set, I grouted using a lime colour Mapei Grout and the job was complete. Most Porcelain tiles are sealed in the factory so it was not necessary to apply one.

Porcelain Kitchen Diner Floor After Renovation Sidmouth

The result was a fresh and tidy Porcelain tiled floor with a marked improvement particularly on the grout lines and of course a very happy client.


Professional Renovation of a Porcelain Tiled Hallway and Kitchen Floor in Devon

Textured Porcelain Floor Tile and Grout Deep Cleaned and Tile Replaced in Sidmouth Read More »

Small Victorian Tiled Vestibule Exmouth Before and After Cleaning

Small Victorian Tiled Vestibule Exmouth

The owner of this property had been intending to have her Victorian tiled vestibule professionally cleaned and sealed for several years but had always seemed to just ‘make do’ with an occasional clean with a mop and bucket. Having made up her mind to have it professionally cleaned and having seen previous examples of my work online after searching for her local stone and tile cleaning professional she asked me to come and have a look and see what I could do.

Small Victorian Tiled Vestibule Exmouth Before Cleaning
Being the first stop upon entering the house the tiles were heavily soiled after years of not being sealed so after I conducted a moisture check which showed the tiles to be remarkably dry. I cleaned a few tiles using some diamond hand pads to test the area and give the customer an idea of what kind of result to expect. She was really pleased with the initial outcome of the test and booked me in to return shortly after receiving my quote.

Because the area was small I was able to tie it in with another job I had in the Exmouth area and was able to reduce the cost of the quote. This is a great option if you and your neighbour both have small areas to clean because I may be able to work on them concurrently which will save you both money!

Cleaning/Repairing a Victorian Tiled Vestibule Floor

The working area was quite tight, so the tiles were scrubbed using a series of diamond impregnated six-inch burnishing pads fitted to a rotary hand tool. The pads are used in sequence starting with a 100-grit and finishing with a 400-grit pad. The floor was then thoroughly rinsed using a wet vacuum to remove the soil that was generated during the process.

The next step was to give the tiles an acid rinse; now we don’t normally recommend the use of acids on tiles but in this case the product was only on the floor long enough to remove old grout smears and mineral deposits before being rinsed off. I used Tile Doctor Grout Clean-Up for this and it has the extra advantage of countering any alkaline salts which can hiding in the pores of the tile, this is very useful on old floors of this type with no damp proof course. If left unaddressed the salts can rise through the tile as moisture evaporates leaving unsightly white salt stains on the floor. This process is known as efflorescence and can be tricky to remove later if not dealt with quickly.

Small Victorian Tiled Vestibule Exmouth During Cleaning
One done the floor was given a final rinse and then dried with the wet vacuum. I then made a few small repairs to some loose tiles and then left for the evening to allow the floor the whole floor to dry off fully overnight.

Sealing a Victorian Tiled Vestibule Floor

The following day I returned and after rechecking the moisture levels of both areas to ensure that they had adequately dried out I started work, applying a coat of Tile Doctor’s Colour Grow. This is an impregnating sealer which picks out and enhances the natural colours of the tiles, not only bringing the whole floor to life but helping to disguise any damage the floor has suffered over the years.

Small Victorian Tiled Vestibule Exmouth During Sealing
After this coat had dried sufficiently I applied four coats of Tile Doctor’s Seal and Go to finish off the floor and give it that ‘wow factor’. I left the client with some guidance on care and maintenance of the floor as well as a suitable bottle of cleaner.

Small Victorian Tiled Vestibule Exmouth After Cleaning
The client was very happy with the result and her sealed floor is now easier to maintain and keep clean. The Victorian tiles are now in keeping with the rest of the house.


Professional Restoration of Small Victorian Tiled Vestibule in Exmouth

Small Victorian Tiled Vestibule Exmouth Read More »

Mid Victorian Tiled Farmhouse Hallway Clyst Hydon Before and After Cleaning

Mid Victorian Farmhouse Hallway Clyst Hydon

The owners of this floor in the hallway of their Mid-Victorian farmhouse in Clyde Hydon just outside of Honiton, in Devon asked me to visit shortly after they had moved in. Whilst ripping out the old carpet throughout the house they had come across this stunning Victorian tiled floor. Honiton is a market town, more well known for its lace making. As it is my home town, it was a very short commute to work for me, so I was able to visit the property quickly and take a look.

Mid Victorian Tiled Farmhouse Hallway Clyst Hydon Before Cleaning
During my visit I took some moisture readings because these old floors will not have had a damp proof membrane installed and if the moisture levels are too high it can restrict when this type of work can be done due to the sealers needing the floor to be dry(ish), in order to cure. I also did a test clean to show the customers what level of cleaning could be achieved and looked at areas of loose tiles to see if any replacement tiles would need to be sourced. I always like to do a test clean as it demonstrates what can be achieved and it also allows me to work out which methods and products work best.

Cleaning and Repairing a Victorian Tiled Hallway Floor

With the customers happy with the quote I returned to complete the work starting by covering the wooden skirting and bottom of the stairs to protect the paint and carpet from splashing. I then applied a strong dilution of Tile Doctor Pro-Clean on to the floor, ensuring even coverage and keeping an eye on the floor to make sure that it didn’t dry out. Pro-Clean is quite a flexible product than can strip off old sealers when applied in a strong dilution.

After a short time, I set to work scrubbing the Pro-Clean into the floor with a 400-grit diamond pad fitted to a rotary floor buffer. I also used 400-grit hand held burnishing block to cover the corners and any edges not reached by my machine. Once I was satisfied that the tiles were as good as they could be I rinsed the floor to remove the now soiled alkaline cleaner before giving the floor an acid wash with Acid Gel to neutralise with any inherent salts in the tiles.

Before I left for the day I fixed the loose tiles back in place, re-grouted the areas that I had replaced tiles and left an air mover on the floor to aid in the drying process. I also suggested that the radiators in the hallway were turned on overnight to further aid the drying process. Occasionally these types of floors need to be left for several days to dry but it is worth the wait and the floors can be used in the meantime provided only socks and indoor shoes are used and care is taken not to get the floor dirty.

Sealing a Victorian Tiled Hallway Floor

Upon returning the next day I tested the moisture content of the floor and was pleased to find that it was well within acceptable levels for the application of the sealer that I was planning to use. I quickly checked the floor for areas that I felt may be able to be improved and once satisfied a single coat of Tile Doctor Colour Grow sealer was applied to the floor. Colour Grow is a colour enhancing impregnating sealer that occupies the pores in the tile thus preventing dirt from becoming ingrained there.

Once this was dry it was followed up by applying two further coats of Tile Doctor Seal and Go Extra which is a compatible surface sealer that leaves a nice subtle sheen finish. Both sealers are fully breathable and able to cope with any damp issues that may impact the floor over time.

Mid Victorian Tiled Farmhouse Hallway Clyst Hydon After Cleaning
The customers were thrilled and said that they were going to reinstate the hallway as the main entrance to the farmhouse in order to show it off to all their visitors!


Professional Restoration of a Victorian Tiled Hallway in Devon

Mid Victorian Farmhouse Hallway Clyst Hydon Read More »

Scroll to Top