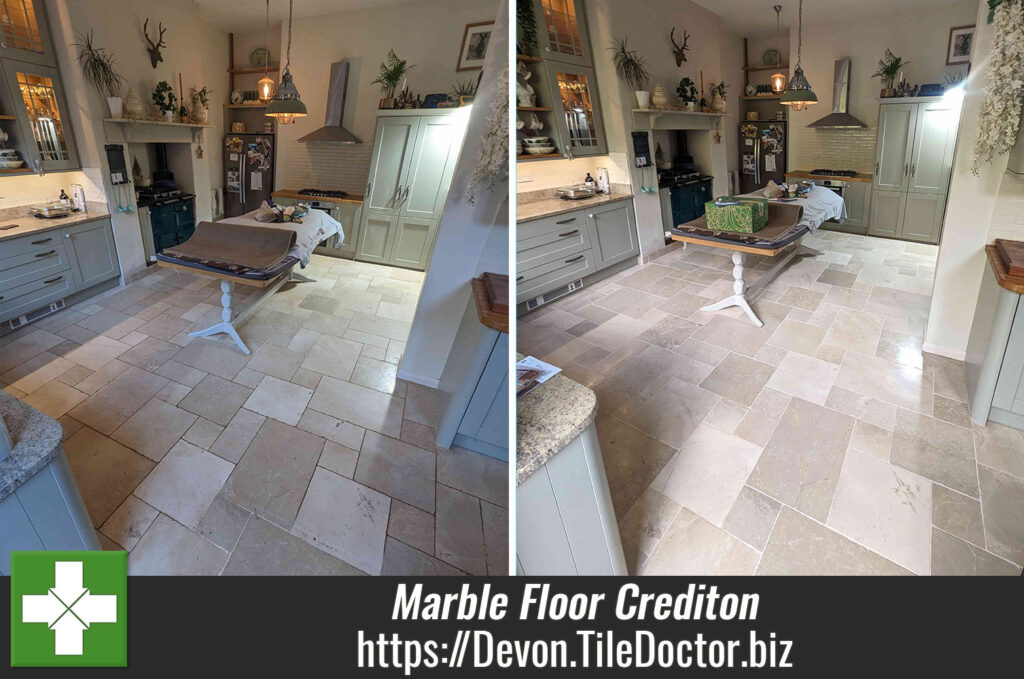
Grout Cleaning and Polishing a Marble Tiled Kitchen Floor in Crediton
This customer in Crediton originally enquired about grout cleaning for their Kitchen floor, however after speaking to them on the phone I discovered their tiles where Marble and so I suggested they may be interested in our stone polishing service as well.
Interested in the possibilities I arranged a time to pop over to the house and conduct a survey and test clean. I’m based in Crediton, so it wasn’t long before I was able to pay them a visit. Whilst there demonstrating grout cleaning, I explained how Marble responds wonderfully to our diamond pad burnishing system and would be possible to go one step further and make this floor a ‘wow’ feature again. I conducted a quick demonstration of the burnishing process which went well, and they agreed it was definitely something they would like to have done and were happy to book me in for both jobs.

Having agreed my quote the only thing that was left was to agree a date to do the work which would take two days. As it turns out they had planned a holiday and so I it was agreed I would do the work whilst they were away to minimise disruption.

Deep Cleaning Grout and Marble Kitchen Tiles
To start, I added low level protection to then the bottom 7 inches or so of the kitchen units and walls to stop any slurry splashes. After this I applied a coat of Tile Doctor alkaline cleaning/stripping product called Remove & Go and left to dwell and soak into the stone. This emulsified and broke down what remained of the existing sealer and ingrained dirt in the grout lines which was causing the discolouration.
After ten minutes the solution was then worked into the floor using a Black scrubbing pad fitted to a rotary floor buffer. Where needed I also used a stiff grout brush along the grout lines until I was satisfied it was as clean and White as it could be. The soiled liquid was then rinsed off the floor and extracted with an industrial wet vacuum.
Next I started the burnishing process with the application of a coarse 400-grit diamond pad fitted to the rotary machine. Using only water for lubrication the pad was worked into each tile until I had covered the whole area. I then repeated this process through 800 and 1500-grit pads extracting the slurry between each pad with the wet vacuum. The pads deep clean the Marble and slowly refine the surface to build up the polished appearance.
After the 1500-grit pad I put several floor fans in place to accelerate the drying of the Marble floor before applying the last pad in the burnishing system which is a very fine 3000-grit polishing pad which adds lovely shine to the Marble and is applied dry with only a little water sprayed onto the tile.
Once done the burnishing work had been completed and it was time to let the floor completely dry out overnight so it would be ready for sealing the next day.
Sealing a Marble Tiled Kitchen Floor
I arrived in the morning and began work by inspecting the floor and taking a few moisture readings to ensure it has completely dry. I was happy with how clean the Grout looked and how well the Marble had responded to the burnishing process. The floor had that smart, eye-catching polished appearance and just needed sealing to protect it from dirt becoming ingrained into the pores of the stone.
Having discussed choice of sealers with the customer previous we had agreed to seal the floor with Tile Doctor Colour Grow. This is a great choice for Marble as it contains a colour enhancer that intensifies the lovely natural mineral colours in the stone which otherwise are lost when dry. Two coats were needed, allowing the first coat to dry before applying the second.

A few days later I heard back from the clients who had just arrived back from their holiday, they were overjoyed with the results I achieved not just to the grout but how well their Marble floor now looked. For aftercare cleaning of polished stone floors, we recommend using Tile Doctor Stone Soap, it’s compatible with sealers and helps maintain the patina on the stone.

Professional Cleaning and Polishing of a Marble Tiled Kitchen Floor in Devon
Grout Cleaning and Polishing a Marble Tiled Kitchen Floor in Crediton Read More »