
Viakal Damaged Marble Tiled Wet Room Restored in Dartmouth
I received an enquiry from an upset customer in Dartmouth whose cleaner had used Viakal to clean their new Marble Tiled wet room. The tiled walls had been sprayed at chest height and then left to dwell for two hours resulting in it running down the wall to the lower half of marble tiling and onto the floor.
Viakal is an acid-based Limescale remover and should never be used on Acid Sensitive stone such as Marble or Limestone. This particular Marble was a dark green and the White etching (damaged areas) caused by the Viakal was very obvious.

After getting in contact with the customer I assured them the chances of me being able to cut out the damage with diamond pads were high. Then after arranging a survey, I visited to carry out a test on both the wall and floor tiles. The tests showed that the floor tiles would need more work than anticipated due to the deeper etching that had occurred due to gravity. The tests showed promise however and I was able to demonstrate the polished appearance of the Marble could be restored.
After the customer had accepted my quote for this work, we booked in some dates for the work to be carried out.
Polishing Acid Etching out of Marble Tiling
I started by giving the Marble wall and floor tiles a clean using a strong dilution of Tile Doctor Pro-Clean sprayed onto the walls. The solution was diluted with 5 parts water and left to soak in before scrubbing with a 6-inch black pad fitted to a hand-buffer. This action was needed to remove any sealer that may still be present.
To remove the acid etching I applied a set of diamond burnishing pads starting with a coarse 400-grit and working from top to bottom. Six-inch pads were used again and only water was applied during the process to provide lubrication. Once done slurry generated was rinsed away with more water.
This process was then repeated with the finer 800-grit, 1500grit and 3000-grit pads until the entirety of the walls had been burnished and given a lovely consistent polished appearance. The process was then repeated on the floor tiles using a rotary machine and larger seventeen-inch burnishing pads. Extra weight was added to the machine to assist with the removal of the deeper etching marks in the floor stones.

Once all the stone in the Wet Room had been fully burnished/polished and had dried, I returned the next day to seal.
Sealing Marble Wet Room Tiles
Having discussed the different sealer options on my initial visit we had selected to use Tile Doctor X-Tra Seal on the Marble. This is a hard-wearing oil-based sealer that’s externally rated so ideal for wet areas like this. It also enhanced the natural colours in the mineral rich Marble. After I had applied two thin coats (allowing approximately 1 hour drying time between coats) the excess was buffed off with a White buffing pad which further enhanced the polished appearance of the stone.

The customer was thrilled with the results and it meant that they could forget about needing to replace the stone and at the same time save themselves a lot of money and disruption.
I spent some time with them after explaining the properties of their Marble and educating them on which products to use (i.e. Stone Soap) and certainly NOT use when carrying out ongoing maintenance.

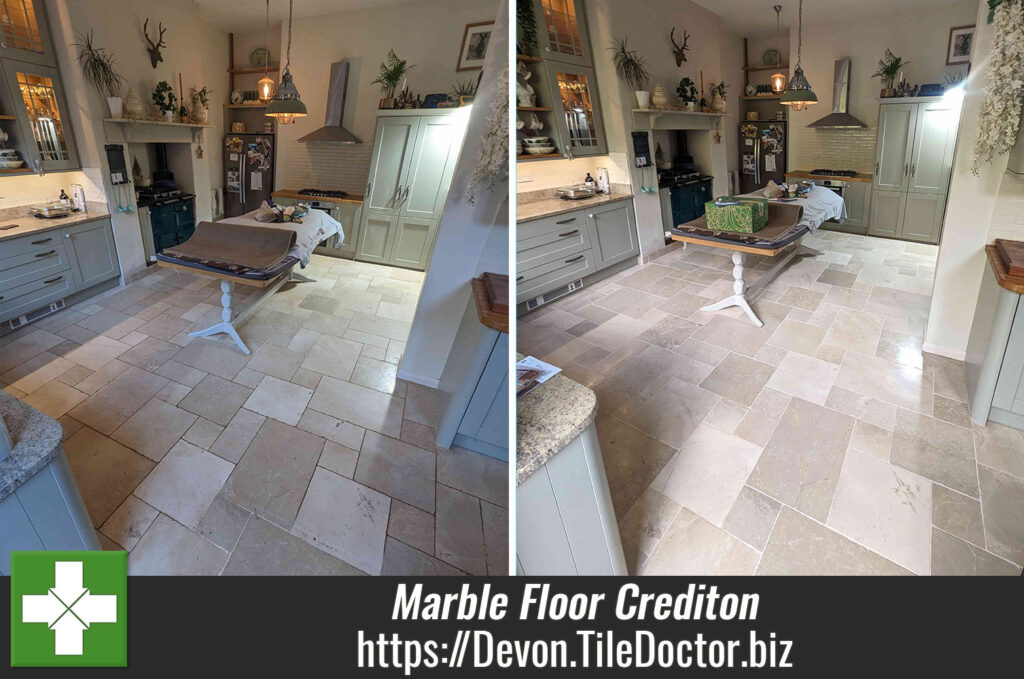
Professional Cleaning and Polishing of a Marble Tiled Kitchen Floor in Devon
Viakal Damaged Marble Tiled Wet Room Restored in Dartmouth Read More »