Exmouth Tile Cleaning

Exmouth Tile Cleaning

Welcome to my Work History archive where you will find examples of the cleaning and renovation of tiles carried out in Exmouth.

Victorian Tiled Hallway Floor Renovated Exmouth

Victorian Tiled Hallway Renovated Ready for House Sale in Exmouth

This owners of this grand Victorian property in Exmouth were putting their home on the market and so decided to have its beautiful patterned Victorian Tiled hallway floor renovated to its former glory first.

Victorian Tiled Hallway Exmouth Before Cleaning

To get the best price for your property it needs looking its best and first impressions count so it makes sense to ensure the frontage and the hallway looks its best.

Victorian Tiled Hallway Exmouth Before Cleaning

Deep Cleaning a Victorian Tiled Hallway Floor

I began by applying Tile Doctor Remove & Go to the floor which was then left to soak in for twenty minutes. This gives the product time to breakdown and emulsify existing sealers and loosen ingrained dirt. I then worked the floor with a 200-grit burnishing pad fitted to a rotary machine which had extra weights fitted to improve contact. The pads are made with industrial Diamonds that cut into and release the dirt bringing it to the surface where it can be removed. To help with lubrication the floor was wetted with minimal amounts of water, old floors like this one will not have had a damp proof membrane installed so it’s best to keep fluids at a minimum.

The now soiled cleaning solution was extracted with a wet vacuum and I hand cleaned around the perimeter with Diamond burnishing blocks. A few rinses were required to remove the now dirty cleaning solution from the floor, again keeping water to a minimum and extracting with the wet vacuum afterwards. The Victorian tile and grout were then left to dry off overnight with the assistance from a couple for floor dryer’s that I left in place overnight.

The following day I went back over the floor with the Diamond handheld burnishing blocks focusing on anything I may have missed the day before such as paints spots from decorating and other stains. Once satisfied I gave the whole floor an acid wash using Tile Doctor Grout Clean-Up worked in with a 400-grit burnishing pad. We do this to prepare the tiles for sealing and neutralises any leftover alkaline cleaning product left in the pores of the tile. This process also removes old grout smears and will counter any latent efflorescent salts in the tiles. Once done, the floor was rinsed, extracted, and left to dry off overnight as before.

Victorian Tiled Hallway Exmouth After Cleaning Sealing

Sealing a Victorian Tiled Hallway Floor

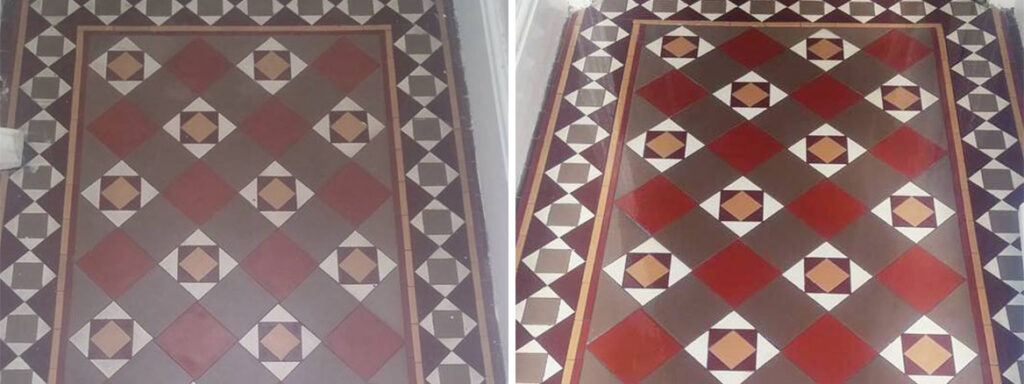
it’s probably difficult to tell how dirty the tiles were from the earlier photographs but by the time I returned on day 3 the customers were already chuffed with how much cleaner the floor was looking.

Moisture readings taken from the floor indicated it was dry enough to seal so I set about applying a base coat of a colour enhancing sealer called Tile Doctor Colour Grow. There was 36m2 of tiling through the hallway section and into the more heavily used entrance way so it took some time to apply. One that was dry I then applied a topcoat of Tile Doctor X-Tra seal to add further protection.

Victorian Tiled Hallway Exmouth After Cleaning

The new sealer will protect against dirt from muddy wellies, boots, and pets, keeping the dirt on the surface where it can easily be removed using an everyday cleaning product like Tile Doctor Neutral Cleaner.

Victorian Tiled Hallway Exmouth After Cleaning Sealing

Professional Renovation of a Victorian Tiled Hallway in Devon

Victorian Tiled Hallway Renovated Ready for House Sale in Exmouth Read More »

Damaged Limestone Hallway Patio Fully Restored in Exminister

Renovating a New Limestone Patio Damaged by Brick Acid in Exminster

I was contacted by a very unhappy customer from the village of Exminster who had recently had a new Limestone Patio laid in the Garden of their house in near Exeter. After the builders had finished laying the patio, they must have used some sort of brick acid to clean the stone and remove excess mortar. With limestone being Acid Sensitive, it etched the stone leaving it in a mess. Also, you need to consider the effects of acid rain so leaving an acid sensitive stone un-protected in the UK is a big no no and will result in its degradation over time.

Acid Damaged Limestone Patio Before Renovation Exminster

Exminster is a village on the southern edge of the City of Exeter, and I often find myself working there, so it was no problem to pop down and visit the property to investigate the problem fully.

Whilst at the property and discussing the Patio with the owner I carried out a couple of tests using various products. The testing went well, and my customer could immediately see the potential of the Patio and how the problems could be rectified. The process I had worked out would involve treating the damaged white areas using a series of Tile Doctor Diamond pads to polish out the damage and then restore the colour and protect the Limestone with Tile Doctor X-Tra seal which is an ideal sealer for external stone. Happy to accept our quote a suitable weather window was chosen, and the date was set for the work to be done.

Renovating an Acid Damaged Limestone Patio

I started by adding weight to a Viper rotary floor buffer and then ran over each slab several times with a very coarse a 100-grit milling pad using water for lubrication. The process was repeated using a finer 200-grit milling pad and then a 400-grit burnishing pad again with water to lubricate the process. After each pad the patio was rinsed with water running at high-pressure using a cleaning and extraction system that is fitted into our van.

After the stones had been renovated, I gave them a full deep clean to remove any remaining dirt and staining using Tile Doctor Remove and Go which was worked into the Limestone with a black scrubbing pad. After a final rinse and extract with the van mounted cleaning system I left the Limestone patio to dry out overnight.

Sealing a Limestone Tiled Patio

With the weather still in our favour I returned the next day to seal and protect the patio with two coats of Tile Doctor X-Tra seal. This is a truly remarkable product which is fully breathable and can be used both internally and externally. It’s an oil-based sealer so its puts back the essential oils that have been leached out of the stone by the use of brick acid, thereby restoring colour and structure to the stone.

Acid Damaged Limestone After Before Renovation Exminster

My customer was very happy with the transformation and with the summer just around the corner can now enjoy their freshly laid Limestone patio in all its glory. More importantly it is now sealed and protected against future elements.

PS… For aftercare of an acid sensitive and sealed patio like this one you need to be careful what you clean it with. In this case I recommend Tile Doctor Neutral Cleaner which has a neutral pH that won’t damage the stone or the sealer. Many of the cleaning products you will find in supermarkets etc. are simply too strong and will weaken the sealer over time.


Professional Restoration of a Damaged Limestone Flagstone Floor in Devon

Renovating a New Limestone Patio Damaged by Brick Acid in Exminster Read More »

Small Victorian Tiled Vestibule Exmouth Before and After Cleaning

Small Victorian Tiled Vestibule Exmouth

The owner of this property had been intending to have her Victorian tiled vestibule professionally cleaned and sealed for several years but had always seemed to just ‘make do’ with an occasional clean with a mop and bucket. Having made up her mind to have it professionally cleaned and having seen previous examples of my work online after searching for her local stone and tile cleaning professional she asked me to come and have a look and see what I could do.

Small Victorian Tiled Vestibule Exmouth Before Cleaning
Being the first stop upon entering the house the tiles were heavily soiled after years of not being sealed so after I conducted a moisture check which showed the tiles to be remarkably dry. I cleaned a few tiles using some diamond hand pads to test the area and give the customer an idea of what kind of result to expect. She was really pleased with the initial outcome of the test and booked me in to return shortly after receiving my quote.

Because the area was small I was able to tie it in with another job I had in the Exmouth area and was able to reduce the cost of the quote. This is a great option if you and your neighbour both have small areas to clean because I may be able to work on them concurrently which will save you both money!

Cleaning/Repairing a Victorian Tiled Vestibule Floor

The working area was quite tight, so the tiles were scrubbed using a series of diamond impregnated six-inch burnishing pads fitted to a rotary hand tool. The pads are used in sequence starting with a 100-grit and finishing with a 400-grit pad. The floor was then thoroughly rinsed using a wet vacuum to remove the soil that was generated during the process.

The next step was to give the tiles an acid rinse; now we don’t normally recommend the use of acids on tiles but in this case the product was only on the floor long enough to remove old grout smears and mineral deposits before being rinsed off. I used Tile Doctor Grout Clean-Up for this and it has the extra advantage of countering any alkaline salts which can hiding in the pores of the tile, this is very useful on old floors of this type with no damp proof course. If left unaddressed the salts can rise through the tile as moisture evaporates leaving unsightly white salt stains on the floor. This process is known as efflorescence and can be tricky to remove later if not dealt with quickly.

Small Victorian Tiled Vestibule Exmouth During Cleaning
One done the floor was given a final rinse and then dried with the wet vacuum. I then made a few small repairs to some loose tiles and then left for the evening to allow the floor the whole floor to dry off fully overnight.

Sealing a Victorian Tiled Vestibule Floor

The following day I returned and after rechecking the moisture levels of both areas to ensure that they had adequately dried out I started work, applying a coat of Tile Doctor’s Colour Grow. This is an impregnating sealer which picks out and enhances the natural colours of the tiles, not only bringing the whole floor to life but helping to disguise any damage the floor has suffered over the years.

Small Victorian Tiled Vestibule Exmouth During Sealing
After this coat had dried sufficiently I applied four coats of Tile Doctor’s Seal and Go to finish off the floor and give it that ‘wow factor’. I left the client with some guidance on care and maintenance of the floor as well as a suitable bottle of cleaner.

Small Victorian Tiled Vestibule Exmouth After Cleaning
The client was very happy with the result and her sealed floor is now easier to maintain and keep clean. The Victorian tiles are now in keeping with the rest of the house.


Professional Restoration of Small Victorian Tiled Vestibule in Exmouth

Small Victorian Tiled Vestibule Exmouth Read More »

Small Victorian Tiled Hallway Entrance Exeter Before and After Cleaning

100 Year-Old Victorian Hallway Tiles Renovated in Exeter

I was contacted by the owners of a Victorian terraced house in Exeter who had been lovingly restoring the property over the last couple of years and during the work they uncovered this section of tiled flooring and had decided to bring me in to make it look its best. It’s possible that this section of floor was all that was left from when the house was built over 100 years ago and at some point, in the past the rest of the floor was removed and replaced with something more modern.

Exeter has an abundance of character properties and there seems to be a bit of a trend to restore period features such as fireplaces and old floors at present. It’s always worth looking under old carpets and vinyl in the search of classic floors such as this, particularly if your neighbours have them, after all it will add value!

I visited the property to take a closer look and to take some moisture readings because these old floors were laid without a damp proof membrane and high moisture levels can restrict when this type of work can be carried out due to the sealer needing the floor to be dry(ish) in order to cure. I also did a test clean on one section of the floor to show the customer what level of cleaning could be achieved and inspected the floor for loose tiles to see if any replacement tiles would need to be sourced.

Small Victorian Tiled Hallway Entrance Exeter Before Cleaning

Cleaning Victorian Tiled Reception Area

With the customers happy with the quote I returned to complete the work starting by protecting the skirting and bottom of the stair carpet. Once done I began the cleaning process by applying a strong stripper/degreaser called Tile Doctor Pro-Clean on to the floor. For best results you need to achieve an even coverage and keeping and check it regularly to ensure it doesn’t dry out. After a short dwell time I set to work scrubbing the floor with a 400-grit diamond burnishing pad fitted to a rotary buffing machine. This really works the cleaning product into the pores of the tiles releasing the dirt and removes any sealers or other old coatings in the process. These large 17” pads do struggle to reach into the corners and edges of the floor however, so I always finish off with a hand-held diamond block. Once I was satisfied that the tiles were as good as they could be I rinsed the floor of the alkaline cleaner and dirty water and extracted the soil using a wet vacuum.

Next step was to give the floor what we like to call and Acid Rinse or Acid Wash as some of my colleagues refer to it. We don’t normally use acidic products on tile or stone however they are particularly good at dealing with mineral sales and removing grout smears. Old floors like these are particularly vulnerable to a natural process called efflorescence which results in white mineral salt deposits being left on the surface of the tile as the floor fully dries out and can interfere with the sealer. To counter this, the floor is cleaned with Tile Doctor Grout Clean-up, which is an acid-based product that will neutralise the alkalinity in the floor. The solution is quickly scrubbed into the floor and then rinsed off with water.

Before I left for the day I fixed any loose tiles back into place, re-grouted where needed and left an air mover on the floor to aid in the drying of the tiles. If there are radiators in the area I also suggest that they are turned on overnight to further aid the drying process. Occasionally these types of floors need to be left for several days to dry but it is worth the wait and the floors can be used in the meantime provided indoor shoes and socks only are used and care is taken not to get the floor dirty.

Sealing an Original Victorian Tiled Hallway and Entrance Lobby

Upon returning the next day I tested the moisture content of the floor and was pleased to find that it was well within acceptable levels for the application of the sealer that I was planning to use.

I quickly checked the floor for areas that I felt may be able to be improved and once satisfied I started the sealing process by applying a single coat of Tile Doctor Colour Grow which is an impregnating sealer that soaks into the pores of the tile protecting it from within and improving the colours in the tile beforehand. This was following with two coats of Tile Doctor Seal and Go that will add further protection and give the floor a subtle satin finish.

Small Victorian Tiled Hallway Entrance Exeter After Cleaning
The customers were thrilled and said that they wished they had brought me in sooner! For aftercare I left the customer with some guidance on care and maintenance of the floor as well as a suitable bottle of neutral tile cleaner.

Professional Renovation of a Victorian Tiled Hallway Floor in Devon

100 Year-Old Victorian Hallway Tiles Renovated in Exeter Read More »

Victorian Tiled Hallway Broadclyst Farmhouse Before and After cleaning

Victorian Tiled Farmhouse Hallway Deep Cleaned in Broadclyst

I was contacted by the owners of an old Farmhouse in the East Devon village of Broadclyst to look at their Victorian Tiled Hallway floor which as you can see from the photograph below was heavily stained and had also been splashed with paint from decorating. Victorian tiles are very robust and can take a lot of punishment which you certainly get in a farmhouse, however once the sealer wears off dirt gets into the pores of the tile making it very difficult to clean.

I visited the property to take a closer look and to take some moisture readings because these old floors don’t have a Damp Proof Course and moisture levels too high can restrict when this type of work can be done due to the sealers needing the floor to be dry in order to cure. I also did a test piece to show the customers what level of cleaning could be achieved.

Victorian Tiled Hallway Broadclyst Farmhouse before cleaning

Cleaning a Victorian Tiled Hallway

With the customers happy with the quote I returned to complete the work starting by covered the skirting and bottom of the stairs to protect the paintwork and carpet. I then put a strong stripper/degreaser called Pro Clean on to the floor, ensuring even coverage and keeping and eye on the floor to make sure that it didn’t dry out.

After a short dwell time I set to work scrubbing the floor with a 400 grit diamond burnishing pad and using small hand blocks to get into the corners and any edges not reached by my machine. Once I was satisfied that the tiles were as good as they could be I rinsed the floor to remove the alkaline cleaner and soiled water.

This was followed by giving the floor an Acid rinse using Tile Doctor’s Acid Gel, this process counteracts any alkaline salts that can rise up through the tile as it dries out, a process which is more commonly known as efflorescence. This can be quite a problem on floors like this that don’t have a damp proof course (floors generally didn’t pre-1950s). I had to be careful not to leave the acid down for too long because these tiles are susceptible to acid damage.

Dealing with salt issues on these old floors (efflorescence) is essential because they can damage the sealer or become trapped under it, detracting from the beauty of the floor. Given the age of the farmhouse it’s difficult to know what the floor had been laid onto. Often it was compacted rubble and building works from the erection of the adjoining buildings; additionally some of the later Victorian floors were laid on a wet limecrete scree which contain a high salt-content.

Before I left for the day I left an air mover on the floor to aid in the drying of the tiles. If there are radiators in the area I also suggest that they are turned on overnight to further aid the drying process. Occasionally these types of floors need to be left for several days to dry but it is worth the wait and the floors can be used in the meantime provided indoor shoes and socks only are used and care is taken not to get the floor dirty.

Sealing an Old Victorian Tiled Hallway

Upon returning the next day I tested the moisture content of the floor and was pleased to find that it was well within acceptable levels for the application of the sealer that I was planning to use. I quickly checked the floor for areas that I felt may be able to be improved and once satisfied a single coat of matt-finish, colour-enhancing sealer called Colour Grow was applied before two coats of a Seal and Go sealer was used to give the floor a satin finish, which I think gives it a slight glaze and freshly mopped appearance.

Victorian Tiled Hallway Broadclyst Farmhouse before cleaning
The customers were thrilled and said that they wished they had brought me in sooner!

Professional Deep Clean and Seal of a Victorian Tiled Hallway in East Devon

Victorian Tiled Farmhouse Hallway Deep Cleaned in Broadclyst Read More »

Terracotta Tiled Floor in Lympstone Before and After Cleaning

Terracotta Tiled Floor Transformed with a Deep Clean and Seal in Lympstone

Terracotta, terra cotta or terra-cotta meaning baked earth is a clay based tile which can be glazed or unglazed and were traditionally hand-made. Because of the material used to produce the tiles they are very porous and the firing process creates a lot of variation of colour not just between each tile but within each individual tile. The two main types of terracotta tile are Spanish and Mexican, or Saltillo, and have different colour variations and characteristics but are essentially treated in the same way. There are even some manufacturers that offer paw prints in tiles, although they cost extra!

Of course, Terracotta is also commonly used as a material for tiled floors due to the warming and homely characteristics of the stone, associated with old country living. Indeed, a Terracotta tiled floor can be an asset to any home, but only if it is routinely maintained.

I recently visited a property in Lympstone, a small picturesque harbour village in East Devon in the area of Woodbury, to tend to a lovely Terracotta tiled floor that had been installed in an open-plan kitchen/diner. The tiles had gotten very dirty over its fifteen-year life and the current owners were struggling to clean it and had spent a long time scrubbing the floor with very little reward.

Once on-site I conducted a small test clean on the floor which was very successful and gave the customers confidence in going forward. Happy to give me the work we agreed a date and I came back a few weeks later.

Terracotta Tiled Floor in Lympstone Before Cleaning

Deep Cleaning Terracotta Tiles

Because of the undulation and texture in the tiles, the floor was treated using Tile Doctor’s Oxy-Gel, a powerful and fast-acting alkaline stripper/degreaser which is ideal for use on vertical surface and uneven tiles such as terracotta because the gel doesn’t run off the higher areas and pool in the lower areas. The product also has a short dwell time which enabled the entire floor to be cleaned in a day.

The Oxy Gel was scrubbed into the tile and grout with the aid of a stiff bristled monster brush fitter to rotary scrubbing machine. Once the cleaning process had been completed, I extracted the dirty cleaning solution using a wet vacuum and then re-treated any stubborn areas.

Following the cleaning the whole floor was given a thorough rinse to remove any trace of cleaning product. This required a lot more water and brushing than usual because of the tiles acting more like a sponge because they weren’t sealed. Again, a wet vacuum was used to extract the water and get the floor as dry as possible.

Sealing Terracotta Tiles

Because Terracotta is a very porous tile I left the floor for five days to ensure it would be dry enough when I returned to seal it. Tiles need to be dry before sealing as any excess moisture and damp issues can upset the performance of the sealer.

I tested the floor for dampness on my return and found it had dried well and was ready to be sealed. This allowed me to proceed with sealing the tiles using Tile Doctor Seal and Go, which is an acrylic, topical sealer. It provides a both a stain resistant surface seal and a durable low-sheen satin finish.

Being the product is water-based there no smell is given off by the sealer as it dries, and since the Terracotta is very porous I ended up using nine coats of sealer which is not uncommon on this type of tile. Once fully sealed the floor will not absorb water and so is easier to clean and much more resistant to staining.

Terracotta Tiled Floor in Lympstone After Cleaning
As you can see from the above photo, the condition of the floor was massively improved. What was a very dull and stained Terracotta floor is now colourful and clean. Certainly, the customer was really pleased with the outcome and left the following feedback:

“Stuart was punctual to the minute and thoroughly friendly and professional at all times.
We are very pleased with the floor and highly recommend him. Ryan S.”

Professional Cleaning and Sealing of a Dirty Terracotta Tiled Floor in Devon

Terracotta Tiled Floor Transformed with a Deep Clean and Seal in Lympstone Read More »

Unfilled Travertine Floor Exeter Before and After Burnishing

Dirty Travertine Kitchen Tiles Burnished and Sealed in Exeter

This Travertine kitchen floor in Exeter was mistakenly bought unfilled so there were deep holes on the surface of the stone that attracted grime and dirt in addition the floor had not been sealed to protect the stone and the whole floor was now in need of a deep clean and seal. The owners had installed the floor about five years before and were disappointed by the appearance from the onset. In fact, the floor had never lived up to their expectations and were close to ripping it up and starting again.

Unfilled Travertine Floor Exeter Before Burnishing
Travertine is a lovely stone and really adds to the appearance of any room however being a form of Limestone and acid sensitive it naturally suffers from pitting corrosion which leads to the creation of small holes in the stone. These small holes rapidly become ingrained with dirt and this ruins the appearance of the floor. Typically, Travertine tiles will be bought with the pitted holes pre-filled with a resin to avoid this problem.

After an initial visit to test the floor to identify the best products to use and a chat with the owners to talk through options, duration and processes involved a quote was produced along with standard T&Cs and the work was booked in to be completed shortly after.

Unfilled Travertine Floor Exeter Before Burnishing

Burnishing a Dirty Travertine Tiled Kitchen Floor

Burnishing is our tried and tested process for restoring polished stone such as Travertine, Limestone and Marble which has become stained and dirty. It involves the application of four diamond encrusted burnishing pads of varying grit levels from 100 to 1500.

The first pad, which is Coarse, was applied to the stone together with a dilution of Tile Doctor Remove and Go, a strong stripper/degreaser to get into the pitting and lift the grime and completely strip away the top layer of dirt, exposing the clean layer underneath.

The floor is rinsed with water and the soil extracted before the application of the Medium, Fine, and eventually the Very Fine pad to build up the polished appearance of the stone.

As well as using the burnishing pad system, I also applied to the floor Tile Doctor Remove and Go, which removes any old sealer and penetrates the pitted holes to lift out and dissolve the ingrained dirt.

At the end of the first day the floor was thoroughly rinsed to remove the dirt and chemicals from the now clean floor and the majority of the pitting was filled with a suitable filler.

Sealing a Travertine Tiled Floor

The floor was left to dry off overnight with the assistance of underfloor heating and then the following day a 3,000 grit extra fine diamond pad was used to clear off any remaining residue and give the tiles a slight shine before moving onto the next step of sealing the tiles.

I sealed the floor using Tile Doctor Ultra-Seal, which is a natural look penetrating sealer that leaves a matt finish. The sealer will ensure the tiles are more resistant to staining and allow the floor to look as the customer originally wanted it to look for a lot longer.

Unfilled Travertine Floor Exeter After Burnishing
For after care I left the customer with a bottle of Tile Doctor Stone Soap which is a very easy to use, neutral pH cleaner for natural, sealed stone which not only cleans the tiles but continues to add to the natural patina so the more you use it the better the floor continues to look.

Unfilled Travertine Floor Exeter After Burnishing
 

Professional Restoration of a Dirty and Un-Filled Travertine Tiled Kitchen Floor in Exeter

Dirty Travertine Kitchen Tiles Burnished and Sealed in Exeter Read More »

=================================

Devon Tile Doctor

================================= Read More »

Scroll to Top