Burnishing Pads

Blue Lias Limestone Countertop Polishing in Salcombe

Stained Limestone Countertop Renovated in Salcombe Holiday Rental

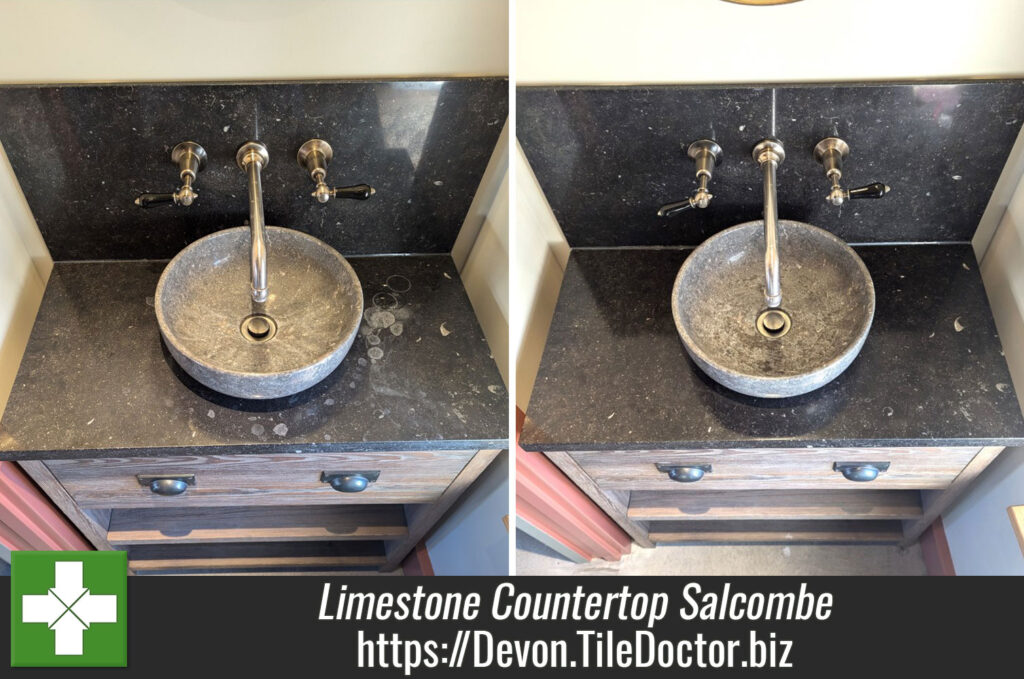
I received an enquiry from a client with a property in Salcombe with an expensive Blue Lias limestone countertop in the bathroom. The property was let out to holiday makers and a previous guest had stained the work surface. From the pictures I could tell that the stone had been damaged by an acid-based product which had been left on the stone for too long and had etched the surface.

Blue Lias Limestone Wash Basin Countertop Before Polishing in Salcombe

Limestone is an acid sensitive stone, so you must be careful what products are used to clean it. Strong cleaning products should be avoided as they will mark the surface, if in doubt check the label for compatibility or purchase a purpose made cleaner such as Tile Doctor Stone Patina Spray

Given the property was a holiday let, they wanted this work carried out during changeover before the next set of guests arrived. Fortunately, it was a small job and after a slight shuffle I was able to squeeze it in between other jobs.

I’ve worked on these issues before so after reviewing the pictures I was able to give them a price that included the necessary materials. Happy with that I was given instructions on how to access the property and the work was scheduled.

Polishing Marks out of a Limestone Countertop

Work began with polishing to remove the deep etching from the countertop. To do this, Tile Doctor Handheld Diamond burnishing blocks were applied to the stone with a little water for lubrication. This started with a coarse 200-grit and then followed up with a 400-grit until all the signs of the white etching had gone. The countertop was wiped clean after each block was applied to remove the small amount of slurry that the process generates.

I then started with a handheld polishing machine fitted with Tile Doctor 6-inch Burnishing Pads working right the way through the system of 400-grit, 800-grit, 1500-grit and 3000-grit. Again, water was used to lubricate, and the resultant slurry was removed after each pad.

Once I was happy, I had burnished out all scratches and brought up the polished appearance of the limestone the stone was dried with a heat gun.

Sealing a Limestone Wash Basin Countertop

Once dry the limestone countertop was sealed with two thin coats of Tile Doctor X-Tra Seal which enhanced the dark colours and fossils in this Blue Lias stone. This product is an impregnating sealer that is rated for external use and so an ideal choice for a countertop that might get wet. To finish the job off the stone was buffed using a 6-inch White buffing pad over the surface with the polishing machine to heighten the polished finish that little bit more.

Blue Lias Limestone Wash Basin Countertop After Polishing in Salcombe

The owner of the property was delighted with the results and happy that her guests who were due to arrive the following morning wouldn’t encounter the stained limestone in an otherwise 5-star setting.


Professional Renovation of a Stained Limestone Countertop in Devon

Stained Limestone Countertop Renovated in Salcombe Holiday Rental Read More »

Viakal Damaged Marble Tiled Wet Room Restoration Dartmouth

Viakal Damaged Marble Tiled Wet Room Restored in Dartmouth

I received an enquiry from an upset customer in Dartmouth whose cleaner had used Viakal to clean their new Marble Tiled wet room. The tiled walls had been sprayed at chest height and then left to dwell for two hours resulting in it running down the wall to the lower half of marble tiling and onto the floor.

Viakal is an acid-based Limescale remover and should never be used on Acid Sensitive stone such as Marble or Limestone. This particular Marble was a dark green and the White etching (damaged areas) caused by the Viakal was very obvious.

Viakal Damaged Marble Tiled Wet Room Before Renovation Dartmouth

After getting in contact with the customer I assured them the chances of me being able to cut out the damage with diamond pads were high. Then after arranging a survey, I visited to carry out a test on both the wall and floor tiles. The tests showed that the floor tiles would need more work than anticipated due to the deeper etching that had occurred due to gravity. The tests showed promise however and I was able to demonstrate the polished appearance of the Marble could be restored.

After the customer had accepted my quote for this work, we booked in some dates for the work to be carried out.

Polishing Acid Etching out of Marble Tiling

I started by giving the Marble wall and floor tiles a clean using a strong dilution of Tile Doctor Pro-Clean sprayed onto the walls. The solution was diluted with 5 parts water and left to soak in before scrubbing with a 6-inch black pad fitted to a hand-buffer. This action was needed to remove any sealer that may still be present.

To remove the acid etching I applied a set of diamond burnishing pads starting with a coarse 400-grit and working from top to bottom. Six-inch pads were used again and only water was applied during the process to provide lubrication. Once done slurry generated was rinsed away with more water.

This process was then repeated with the finer 800-grit, 1500grit and 3000-grit pads until the entirety of the walls had been burnished and given a lovely consistent polished appearance. The process was then repeated on the floor tiles using a rotary machine and larger seventeen-inch burnishing pads. Extra weight was added to the machine to assist with the removal of the deeper etching marks in the floor stones.

Viakal Damaged Marble Tiled Wet Room During Renovation Dartmouth

Once all the stone in the Wet Room had been fully burnished/polished and had dried, I returned the next day to seal.

Sealing Marble Wet Room Tiles

Having discussed the different sealer options on my initial visit we had selected to use Tile Doctor X-Tra Seal on the Marble. This is a hard-wearing oil-based sealer that’s externally rated so ideal for wet areas like this. It also enhanced the natural colours in the mineral rich Marble. After I had applied two thin coats (allowing approximately 1 hour drying time between coats) the excess was buffed off with a White buffing pad which further enhanced the polished appearance of the stone.

Viakal Damaged Marble Tiled Wet Room After Renovation Dartmouth

The customer was thrilled with the results and it meant that they could forget about needing to replace the stone and at the same time save themselves a lot of money and disruption.

I spent some time with them after explaining the properties of their Marble and educating them on which products to use (i.e. Stone Soap) and certainly NOT use when carrying out ongoing maintenance.

Viakal Damaged Marble Tiled Wet Room After Renovation Dartmouth


Professional Cleaning and Polishing of a Marble Tiled Kitchen Floor in Devon

Viakal Damaged Marble Tiled Wet Room Restored in Dartmouth Read More »

Marble Tile and Grout Cleaned and Polished in Crediton Devon

Grout Cleaning and Polishing a Marble Tiled Kitchen Floor in Crediton

This customer in Crediton originally enquired about grout cleaning for their Kitchen floor, however after speaking to them on the phone I discovered their tiles where Marble and so I suggested they may be interested in our stone polishing service as well.

Interested in the possibilities I arranged a time to pop over to the house and conduct a survey and test clean. I’m based in Crediton, so it wasn’t long before I was able to pay them a visit. Whilst there demonstrating grout cleaning, I explained how Marble responds wonderfully to our diamond pad burnishing system and would be possible to go one step further and make this floor a ‘wow’ feature again. I conducted a quick demonstration of the burnishing process which went well, and they agreed it was definitely something they would like to have done and were happy to book me in for both jobs.

Marble Tiled Kitchen Floor Before Cleaning Crediton

Having agreed my quote the only thing that was left was to agree a date to do the work which would take two days. As it turns out they had planned a holiday and so I it was agreed I would do the work whilst they were away to minimise disruption.

Marble Tiled Kitchen Floor Before Cleaning Crediton

Deep Cleaning Grout and Marble Kitchen Tiles

To start, I added low level protection to then the bottom 7 inches or so of the kitchen units and walls to stop any slurry splashes. After this I applied a coat of Tile Doctor alkaline cleaning/stripping product called Remove & Go and left to dwell and soak into the stone. This emulsified and broke down what remained of the existing sealer and ingrained dirt in the grout lines which was causing the discolouration.

After ten minutes the solution was then worked into the floor using a Black scrubbing pad fitted to a rotary floor buffer. Where needed I also used a stiff grout brush along the grout lines until I was satisfied it was as clean and White as it could be. The soiled liquid was then rinsed off the floor and extracted with an industrial wet vacuum.

Next I started the burnishing process with the application of a coarse 400-grit diamond pad fitted to the rotary machine. Using only water for lubrication the pad was worked into each tile until I had covered the whole area. I then repeated this process through 800 and 1500-grit pads extracting the slurry between each pad with the wet vacuum. The pads deep clean the Marble and slowly refine the surface to build up the polished appearance.

After the 1500-grit pad I put several floor fans in place to accelerate the drying of the Marble floor before applying the last pad in the burnishing system which is a very fine 3000-grit polishing pad which adds lovely shine to the Marble and is applied dry with only a little water sprayed onto the tile.

Once done the burnishing work had been completed and it was time to let the floor completely dry out overnight so it would be ready for sealing the next day.

Sealing a Marble Tiled Kitchen Floor

I arrived in the morning and began work by inspecting the floor and taking a few moisture readings to ensure it has completely dry. I was happy with how clean the Grout looked and how well the Marble had responded to the burnishing process. The floor had that smart, eye-catching polished appearance and just needed sealing to protect it from dirt becoming ingrained into the pores of the stone.

Having discussed choice of sealers with the customer previous we had agreed to seal the floor with Tile Doctor Colour Grow. This is a great choice for Marble as it contains a colour enhancer that intensifies the lovely natural mineral colours in the stone which otherwise are lost when dry. Two coats were needed, allowing the first coat to dry before applying the second.

Marble Tiled Kitchen Floor After Polishing Crediton

A few days later I heard back from the clients who had just arrived back from their holiday, they were overjoyed with the results I achieved not just to the grout but how well their Marble floor now looked. For aftercare cleaning of polished stone floors, we recommend using Tile Doctor Stone Soap, it’s compatible with sealers and helps maintain the patina on the stone.

Marble Tiled Kitchen Floor After Polishing Crediton


Professional Cleaning and Polishing of a Marble Tiled Kitchen Floor in Devon

Grout Cleaning and Polishing a Marble Tiled Kitchen Floor in Crediton Read More »

Victorian Tiled Hallway Floor Restoration Exeter Hotel

Full Victorian Hallway Floor Restoration at Exeter Hotel

I received an inquiry from a client who was in the middle of converting and restoring an old manor house in Exeter, Devon and was keen to understand if her original Minton tiled floor could be salvaged and restored to a similar high standard which met that of the rest of the project.

The owners purchased this period property because of its characterful charm and original features, therefore if it was possible, they wanted to save the floor.

Victorian Tiled Hallway Floor Before Restoration Exeter Hotel

After booking in a survey, I arrived at the property and spoke with one of the owners and the site foreman. It was clear that when this property was in use as a hotel the hallway was utilised for the reception and desks and furniture had taken a real toll on a lot of the individual tiles, many of which were badly chipped, cracked, and damaged.

After inspecting the Victorian floor, I worked out a restoration plan and confirmed I could source matching replacement tiles. This enabled me to create an accurate price for the work which was agreed and I booked in a two-week slot with the owners to carry out the work.

Repairing and Deep Cleaning a Victorian Tiled Hallway Floor

I began the restoration by cutting out all the damaged and broken tiles which would need to be replaced, there were approximately 75 tiles that needed removing. After this I hand cut each coloured shaped tile by templating the originals and dry fitted before installing with adhesive.

Victorian Tiled Hallway Floor During Restoration Exeter Hotel

After all the tiles had been cut, fitted, grouted, and set it was time to move on to cleaning with the aim of restoring the appearance of the whole floor to its original state. I did this by using Tile Doctor’s soft milling pads 100-grit through to 800-grit lubricated with Tile Doctor Remove & Go to help clean and remove any remaining sealer from the floor. The floor is rinsed after each pad and the resultant slurry extracted with a wet vacuum.

The next step was to give the floor an acid rinse using Tile Doctor Grout Clean-up which further cleans the tiles by removing grout haze and other contaminates. Being an acidic product, it has the added benefit of neutralising the pH level of the floor after the use of the alkaline Remove and Go earlier, it also microscopically etches the tile to improve the bond with the sealer which will be added later.

Victorian Tiled Hallway Floor During Restoration Exeter Hotel

Sealing a Victorian Tiled Hallway Floor

At this point I left the floor to dry for a few days before returning to seal the floor using Tile Doctor’s X-Tra Seal which is a colour intensifying and breathable sealer. I applied two coats, allowing each one to dry before applying the next.

Once the sealer had dried, I buffed the floor with a White pad to remove any excess sealer and then ran a 1500-grit burnishing pad over the tiles which added a complimentary natural satin sheen to the tile faces throughout.

Victorian Tiled Hallway Floor After Restoration Exeter Hotel

The hallway looked great, what a transformation, it really complemented the lovely ornate staircase and created a very welcoming entrance to the property. My clients were very satisfied that we had been able to complete such a good restoration and had brought the place back to life enhancing the period features as they had wanted.

Since completion of the job, this restoration has featured in the well-known ‘The Escape To The Chateau’ fan club page on Facebook.


Professional Restoration of a Victorian Tiled Hallway in Devon

Full Victorian Hallway Floor Restoration at Exeter Hotel Read More »

Encaustic Shower Room Floor Tile Cleaning Honiton

Renovating Discoloured Encaustic Floor Tiles in a Honiton Hotel Bathroom

This enquiry came from a prestigious hotel outside Honiton (North of Sidmouth), they were concerned about the appearance of the Black and White floor tiles in one of their luxury bathrooms.

I visited the hotel to survey the floor tiles and could see the tiles were Encaustic and heavily soiled as described. Unlike Ceramic tiles encaustic’s need to be sealed to prevent the build-up of dirt becoming ingrained in the tile. In this case the sealer had worn off with wear and probably the use of strong cleaning products, without the sealer in place the tiles had become discoloured.

Encaustic Shower Room Floor Tiles Before Cleaning Honiton

I knew the problem could be resolved and so informed the manager there would be no need to pull the floor up and replace just before the season was about to start. She was very relieved to hear this and pleased that we could resolve the problem relatively easily and quickly.

Deep Cleaning Encaustic Floor Tiles

To restore the appearance of the encaustic tiles I applied a set of Tile Doctor’s Diamond encrusted Burnishing Pads. Starting with the 400-grit pad fitted to a weighted rotary machine I cut the surface of the tile down whilst lubricating with water during the process. Just enough is removed to get past the staining allowing the original, uniform colours to come back up.

Rinsing and extracting with the wet vacuum after each pad I moved through the series of pads onto the 800 and 1500-grit pads again using water to lubricate. It was then time for a light clean using a dilution of Tile Doctor Pro-Clean to lift out all the remaining slurry and dirt in and around the tiles and joints.

I then put several fan’s on to assist the floor drying before using a spray burnish technique to finish the floor. This is where a small amount of water is sprayed onto the tiles and then a very fine 3000-grit polishing diamond pad fitted to a rotary machine is run over the floor. This process helps reinstate a good level of sheen to the tiles.

Sealing an Encaustic Tiled Shower Room Floor

The following day I returned to seal the tiles first checking the floor had completely dried out. To do this I take several moisture readings using a damp meter. The readings were fine so I was satisfied the tiles were ready to accept a sealer.

To seal Encaustic tiles, I selected Tile Doctors robust colour enhancing sealer called Tile Doctor X-Tra Seal. This will be particularly good for high traffic use and will stand up to the wear and tear in a hotel bathroom.

Encaustic Shower Room Floor Tiles After Cleaning Honiton

The hotel manager was extremely happy with the results and even more so with the fact the hotel doesn’t need to replace the floor at large cost and has insisted she book me back in periodically to work through the other bathrooms/shower-rooms which are all also tiled with encaustic tiles. I also took time to advise the use of Neutral Tile cleaner for the regular cleaning of the encaustic floor tiles, it’s an effective but mild tile cleaner that’s safe to use on sealed tiles.

As much of our business comes from recommendations and repeat clients, this type of work is invaluable to us, we were delighted we could help, now they are ready for the busy holiday season.


Professional Restoration of Encaustic Floor Tiles in Devon

Renovating Discoloured Encaustic Floor Tiles in a Honiton Hotel Bathroom Read More »

Victorian Tiled Hallway Floor Renovated Exmouth

Victorian Tiled Hallway Renovated Ready for House Sale in Exmouth

This owners of this grand Victorian property in Exmouth were putting their home on the market and so decided to have its beautiful patterned Victorian Tiled hallway floor renovated to its former glory first.

Victorian Tiled Hallway Exmouth Before Cleaning

To get the best price for your property it needs looking its best and first impressions count so it makes sense to ensure the frontage and the hallway looks its best.

Victorian Tiled Hallway Exmouth Before Cleaning

Deep Cleaning a Victorian Tiled Hallway Floor

I began by applying Tile Doctor Remove & Go to the floor which was then left to soak in for twenty minutes. This gives the product time to breakdown and emulsify existing sealers and loosen ingrained dirt. I then worked the floor with a 200-grit burnishing pad fitted to a rotary machine which had extra weights fitted to improve contact. The pads are made with industrial Diamonds that cut into and release the dirt bringing it to the surface where it can be removed. To help with lubrication the floor was wetted with minimal amounts of water, old floors like this one will not have had a damp proof membrane installed so it’s best to keep fluids at a minimum.

The now soiled cleaning solution was extracted with a wet vacuum and I hand cleaned around the perimeter with Diamond burnishing blocks. A few rinses were required to remove the now dirty cleaning solution from the floor, again keeping water to a minimum and extracting with the wet vacuum afterwards. The Victorian tile and grout were then left to dry off overnight with the assistance from a couple for floor dryer’s that I left in place overnight.

The following day I went back over the floor with the Diamond handheld burnishing blocks focusing on anything I may have missed the day before such as paints spots from decorating and other stains. Once satisfied I gave the whole floor an acid wash using Tile Doctor Grout Clean-Up worked in with a 400-grit burnishing pad. We do this to prepare the tiles for sealing and neutralises any leftover alkaline cleaning product left in the pores of the tile. This process also removes old grout smears and will counter any latent efflorescent salts in the tiles. Once done, the floor was rinsed, extracted, and left to dry off overnight as before.

Victorian Tiled Hallway Exmouth After Cleaning Sealing

Sealing a Victorian Tiled Hallway Floor

it’s probably difficult to tell how dirty the tiles were from the earlier photographs but by the time I returned on day 3 the customers were already chuffed with how much cleaner the floor was looking.

Moisture readings taken from the floor indicated it was dry enough to seal so I set about applying a base coat of a colour enhancing sealer called Tile Doctor Colour Grow. There was 36m2 of tiling through the hallway section and into the more heavily used entrance way so it took some time to apply. One that was dry I then applied a topcoat of Tile Doctor X-Tra seal to add further protection.

Victorian Tiled Hallway Exmouth After Cleaning

The new sealer will protect against dirt from muddy wellies, boots, and pets, keeping the dirt on the surface where it can easily be removed using an everyday cleaning product like Tile Doctor Neutral Cleaner.

Victorian Tiled Hallway Exmouth After Cleaning Sealing

Professional Renovation of a Victorian Tiled Hallway in Devon

Victorian Tiled Hallway Renovated Ready for House Sale in Exmouth Read More »

Cream Marble Tiled Floor Polished in Lympstone Devon

Wax Sealed 130m2 Cream Marble Tiled Floor Polished in Lympstone

I was asked to pop over to the village of Lympstone to survey a beautiful Cream Mable tiled floor. The owner of the property was unhappy with its appearance as the wax-based product used to seal it previously had significantly dulled over the years resulting in a flat/matte look and making marks extremely obvious and difficult to remove.

Wax based products like the one used on this floor and a traditional method for protecting Marble floor but its easily marked, tricky to remove and with the advent of modern stone sealing products it’s not a solution we recommend

After surveying the 130m2 of Marble tiles, I could see the best way forward would be to remove the wax, clean the floor and then use a ‘Burnishing’ process to bring up the deep natural shine in the stone and then seal to protect. I explained the process in full and a date was agreed for my return to do the renovation.

Marble Floor Before Polishing Lympstone Devon

Deep Cleaning Red and Brown Marble Kitchen Tiles

I began by scrubbing in Tile Doctor Cleaner/Stripper product called Remove & Go, this emulsified and broke down the wax seal, loosened up any surface dirt and marks and cleaned up the grout lines which was significantly discoloured due to years of use.

I find the best was to do this it to spray on the Remove and Go, then let it soak into the tile and then run over each tile with a black scrubbing pad. Pads can struggle to reach into the recesses of the grout line so to ensure a thorough clean I also run a stiff hand brush over the grout.

The floor was rinsed with water and then the soiling extracted with a wet vacuum. It was important to remove the wax before starting the next stage of burnishing other wise the diamond pads used in this process will become clogged with remnants of wax.

Marble Floor During Polishing Lympstone Devon
With the wax removed the chemical clean was complete and I was ready to move onto burnishing the Marble. On this occasion I stared with an 800-grit diamond burnishing pad fitted to a rotary machine running with added weight to make better contact with the floor. I only use water to lubricate the process and make eight to ten passes over each section. The process is then repeated without the weights using a 1500-grit diamond pad and water before vacuuming up the slurry.

Finally, I spray a small amount of fresh water onto the floor and burnish the Marble until almost dry with a 3000-grit diamond pad. This is the last step in the polishing processed and adds a lovely sheen to the stone.

Marble Floor During Polishing Lympstone Devon

Sealing Red and Brown Marble Kitchen Tiles

After the floor had been buffed dry, I finished by sealing the marble with Tile Doctor Ultra seal which is a specially formulated seal specifically for polished marble. It’s a natural look sealer that doesn’t change the characteristics of the stone and is almost invisible.

Ultra-Seal is an impregnating sealer that provides durable protection by impregnating the pores in the stone with sealer, so dirt cannot become ingrained there. The results were sharp and obvious and the customers were both very happy with the results and was a large job on their renovation tick list completed.

Marble Floor After Polishing Lympstone Devon
For aftercare cleaning of polished stone floors, we recommend using Tile Doctor Stone Soap, it’s compatible with sealers and helps maintain the patina on the stone.


Professional Restoration of a Marble Tiled Kitchen Floor in Devon

Wax Sealed 130m2 Cream Marble Tiled Floor Polished in Lympstone Read More »

Damaged Limestone Hallway Patio Fully Restored in Exminister

Renovating a New Limestone Patio Damaged by Brick Acid in Exminster

I was contacted by a very unhappy customer from the village of Exminster who had recently had a new Limestone Patio laid in the Garden of their house in near Exeter. After the builders had finished laying the patio, they must have used some sort of brick acid to clean the stone and remove excess mortar. With limestone being Acid Sensitive, it etched the stone leaving it in a mess. Also, you need to consider the effects of acid rain so leaving an acid sensitive stone un-protected in the UK is a big no no and will result in its degradation over time.

Acid Damaged Limestone Patio Before Renovation Exminster

Exminster is a village on the southern edge of the City of Exeter, and I often find myself working there, so it was no problem to pop down and visit the property to investigate the problem fully.

Whilst at the property and discussing the Patio with the owner I carried out a couple of tests using various products. The testing went well, and my customer could immediately see the potential of the Patio and how the problems could be rectified. The process I had worked out would involve treating the damaged white areas using a series of Tile Doctor Diamond pads to polish out the damage and then restore the colour and protect the Limestone with Tile Doctor X-Tra seal which is an ideal sealer for external stone. Happy to accept our quote a suitable weather window was chosen, and the date was set for the work to be done.

Renovating an Acid Damaged Limestone Patio

I started by adding weight to a Viper rotary floor buffer and then ran over each slab several times with a very coarse a 100-grit milling pad using water for lubrication. The process was repeated using a finer 200-grit milling pad and then a 400-grit burnishing pad again with water to lubricate the process. After each pad the patio was rinsed with water running at high-pressure using a cleaning and extraction system that is fitted into our van.

After the stones had been renovated, I gave them a full deep clean to remove any remaining dirt and staining using Tile Doctor Remove and Go which was worked into the Limestone with a black scrubbing pad. After a final rinse and extract with the van mounted cleaning system I left the Limestone patio to dry out overnight.

Sealing a Limestone Tiled Patio

With the weather still in our favour I returned the next day to seal and protect the patio with two coats of Tile Doctor X-Tra seal. This is a truly remarkable product which is fully breathable and can be used both internally and externally. It’s an oil-based sealer so its puts back the essential oils that have been leached out of the stone by the use of brick acid, thereby restoring colour and structure to the stone.

Acid Damaged Limestone After Before Renovation Exminster

My customer was very happy with the transformation and with the summer just around the corner can now enjoy their freshly laid Limestone patio in all its glory. More importantly it is now sealed and protected against future elements.

PS… For aftercare of an acid sensitive and sealed patio like this one you need to be careful what you clean it with. In this case I recommend Tile Doctor Neutral Cleaner which has a neutral pH that won’t damage the stone or the sealer. Many of the cleaning products you will find in supermarkets etc. are simply too strong and will weaken the sealer over time.


Professional Restoration of a Damaged Limestone Flagstone Floor in Devon

Renovating a New Limestone Patio Damaged by Brick Acid in Exminster Read More »

Scroll to Top