Grout Clean-Up

Victorian Tiled Hallway Floor Restoration Exeter Hotel

Full Victorian Hallway Floor Restoration at Exeter Hotel

I received an inquiry from a client who was in the middle of converting and restoring an old manor house in Exeter, Devon and was keen to understand if her original Minton tiled floor could be salvaged and restored to a similar high standard which met that of the rest of the project.

The owners purchased this period property because of its characterful charm and original features, therefore if it was possible, they wanted to save the floor.

Victorian Tiled Hallway Floor Before Restoration Exeter Hotel

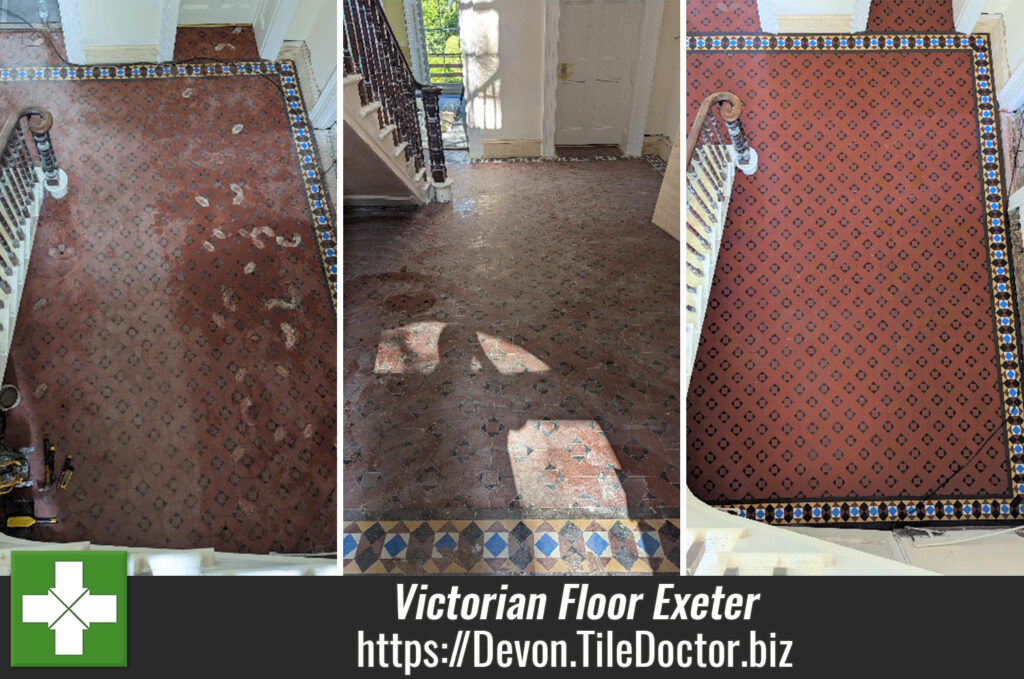
After booking in a survey, I arrived at the property and spoke with one of the owners and the site foreman. It was clear that when this property was in use as a hotel the hallway was utilised for the reception and desks and furniture had taken a real toll on a lot of the individual tiles, many of which were badly chipped, cracked, and damaged.

After inspecting the Victorian floor, I worked out a restoration plan and confirmed I could source matching replacement tiles. This enabled me to create an accurate price for the work which was agreed and I booked in a two-week slot with the owners to carry out the work.

Repairing and Deep Cleaning a Victorian Tiled Hallway Floor

I began the restoration by cutting out all the damaged and broken tiles which would need to be replaced, there were approximately 75 tiles that needed removing. After this I hand cut each coloured shaped tile by templating the originals and dry fitted before installing with adhesive.

Victorian Tiled Hallway Floor During Restoration Exeter Hotel

After all the tiles had been cut, fitted, grouted, and set it was time to move on to cleaning with the aim of restoring the appearance of the whole floor to its original state. I did this by using Tile Doctor’s soft milling pads 100-grit through to 800-grit lubricated with Tile Doctor Remove & Go to help clean and remove any remaining sealer from the floor. The floor is rinsed after each pad and the resultant slurry extracted with a wet vacuum.

The next step was to give the floor an acid rinse using Tile Doctor Grout Clean-up which further cleans the tiles by removing grout haze and other contaminates. Being an acidic product, it has the added benefit of neutralising the pH level of the floor after the use of the alkaline Remove and Go earlier, it also microscopically etches the tile to improve the bond with the sealer which will be added later.

Victorian Tiled Hallway Floor During Restoration Exeter Hotel

Sealing a Victorian Tiled Hallway Floor

At this point I left the floor to dry for a few days before returning to seal the floor using Tile Doctor’s X-Tra Seal which is a colour intensifying and breathable sealer. I applied two coats, allowing each one to dry before applying the next.

Once the sealer had dried, I buffed the floor with a White pad to remove any excess sealer and then ran a 1500-grit burnishing pad over the tiles which added a complimentary natural satin sheen to the tile faces throughout.

Victorian Tiled Hallway Floor After Restoration Exeter Hotel

The hallway looked great, what a transformation, it really complemented the lovely ornate staircase and created a very welcoming entrance to the property. My clients were very satisfied that we had been able to complete such a good restoration and had brought the place back to life enhancing the period features as they had wanted.

Since completion of the job, this restoration has featured in the well-known ‘The Escape To The Chateau’ fan club page on Facebook.


Professional Restoration of a Victorian Tiled Hallway in Devon

Full Victorian Hallway Floor Restoration at Exeter Hotel Read More »

Porcelain Tiled Floor Before After Renovation Sidmouth Exeter

Textured Porcelain Floor Tile and Grout Deep Cleaned and Tile Replaced in Sidmouth

We were contacted by a property owner in Sidmouth near Exeter about their Textured Porcelain floor tiles in the kitchen and hallway which needed a deep clean. The tiles themselves were looking grubby and the grout had become stained and darker with ingrained dirt.

Porcelain Kitchen Diner Floor Before Cleaning Repair Sidmouth

There was also a damaged tile that needed replacing which I was happy to do. We often get asked to replace tiles but we don’t really take on tiling work unless it’s part of a bigger renovation project.

I discussed with them the service we offered and gave them a price for the work, which they were happy to proceed with. We arranged a date to complete the work the following month.

Cleaning Textured Porcelain Hallway and Kitchen Floor Tiles

I started by removing all the kickboards from below the kitchen units and then running a bead of clear silicone sealant around the bases. We tend to use a lot of water when cleaning tiles and as most kitchen units are made from MDF we like to prevent any water becoming absorbed into the units. This will prevent them becoming warped by the water so it’s worth taking the time to remove or protect them. I also added protection around the skirting boards.

The cleaning process began by spraying Tile Doctor Remove & Go onto the floor, this is an alkaline cleaner designed to remove dirt and other coatings. I left it to soak in for 45 minutes before starting to work it in with a rotary buffer fitted with a black scrubbing pad. The long dwell time gives the product time to digest and loosen the ingrained dirt in the textured tile, dips, and grout lines.

Porcelain Kitchen Diner Floor During Cleaning Sidmouth

After scrubbing the tiles, they were then rinsed with a small amount of water. I used a pressurised truck-mount water vacuum system fitted to my van to extract all the remaining soil and product from the floor.

With the soiling removed the floor was left to air dry (which took an hour or so) before neutralising the floor and removing old grout smears with a diluted acid rinse using Tile Doctor Grout Clean Up. After the rinse floor was given another rinse and once again the waste extracted using the truck-mount system.

After this treatment, the floor was looking so much better and I hadn’t finished.

Replacing a Porcelain Kitchen Tile

Returning the following day, the last step was to remove a broken tile and replace with a new matching tile the client had provided. I always recommend buying more tiles that you need and then keep those extras in the loft or something as you never know when they might come in handy.

To remove the broken tile, I stated by cutting though the grout lines separating it from its neighbours and then carefully breaking the tile up for with a hammer action drill fitted with a chisel bit. The bits of old tile were removed and what was left of the grout was removed using a small Grout-Out tool.

Porcelain Kitchen Diner Floor During Tile Replacement Sidmouth Porcelain Kitchen Diner Floor During Tile Removed Sidmouth

You have to be careful when doing this sort of work as many modern kitchen floors are installed with an electric heating matt which is easily destroyed when lifting a tile. In this case there was no matt under the tile but to my surprise the was another tile so it was clear that the tiler had simply tiled over an existing tiled floor. I hear this is a popular thing to do as a tiled floor usually makes a good base.

With the area cleaned up, it was simply a case of applying fresh rapid setting adhesive and fitting the new tile in place. Once the adhesive had set, I grouted using a lime colour Mapei Grout and the job was complete. Most Porcelain tiles are sealed in the factory so it was not necessary to apply one.

Porcelain Kitchen Diner Floor After Renovation Sidmouth

The result was a fresh and tidy Porcelain tiled floor with a marked improvement particularly on the grout lines and of course a very happy client.


Professional Renovation of a Porcelain Tiled Hallway and Kitchen Floor in Devon

Textured Porcelain Floor Tile and Grout Deep Cleaned and Tile Replaced in Sidmouth Read More »

Victorian Tiled Hallway Floor Renovated Exmouth

Victorian Tiled Hallway Renovated Ready for House Sale in Exmouth

This owners of this grand Victorian property in Exmouth were putting their home on the market and so decided to have its beautiful patterned Victorian Tiled hallway floor renovated to its former glory first.

Victorian Tiled Hallway Exmouth Before Cleaning

To get the best price for your property it needs looking its best and first impressions count so it makes sense to ensure the frontage and the hallway looks its best.

Victorian Tiled Hallway Exmouth Before Cleaning

Deep Cleaning a Victorian Tiled Hallway Floor

I began by applying Tile Doctor Remove & Go to the floor which was then left to soak in for twenty minutes. This gives the product time to breakdown and emulsify existing sealers and loosen ingrained dirt. I then worked the floor with a 200-grit burnishing pad fitted to a rotary machine which had extra weights fitted to improve contact. The pads are made with industrial Diamonds that cut into and release the dirt bringing it to the surface where it can be removed. To help with lubrication the floor was wetted with minimal amounts of water, old floors like this one will not have had a damp proof membrane installed so it’s best to keep fluids at a minimum.

The now soiled cleaning solution was extracted with a wet vacuum and I hand cleaned around the perimeter with Diamond burnishing blocks. A few rinses were required to remove the now dirty cleaning solution from the floor, again keeping water to a minimum and extracting with the wet vacuum afterwards. The Victorian tile and grout were then left to dry off overnight with the assistance from a couple for floor dryer’s that I left in place overnight.

The following day I went back over the floor with the Diamond handheld burnishing blocks focusing on anything I may have missed the day before such as paints spots from decorating and other stains. Once satisfied I gave the whole floor an acid wash using Tile Doctor Grout Clean-Up worked in with a 400-grit burnishing pad. We do this to prepare the tiles for sealing and neutralises any leftover alkaline cleaning product left in the pores of the tile. This process also removes old grout smears and will counter any latent efflorescent salts in the tiles. Once done, the floor was rinsed, extracted, and left to dry off overnight as before.

Victorian Tiled Hallway Exmouth After Cleaning Sealing

Sealing a Victorian Tiled Hallway Floor

it’s probably difficult to tell how dirty the tiles were from the earlier photographs but by the time I returned on day 3 the customers were already chuffed with how much cleaner the floor was looking.

Moisture readings taken from the floor indicated it was dry enough to seal so I set about applying a base coat of a colour enhancing sealer called Tile Doctor Colour Grow. There was 36m2 of tiling through the hallway section and into the more heavily used entrance way so it took some time to apply. One that was dry I then applied a topcoat of Tile Doctor X-Tra seal to add further protection.

Victorian Tiled Hallway Exmouth After Cleaning

The new sealer will protect against dirt from muddy wellies, boots, and pets, keeping the dirt on the surface where it can easily be removed using an everyday cleaning product like Tile Doctor Neutral Cleaner.

Victorian Tiled Hallway Exmouth After Cleaning Sealing

Professional Renovation of a Victorian Tiled Hallway in Devon

Victorian Tiled Hallway Renovated Ready for House Sale in Exmouth Read More »

Terracotta Tiled Floor Sealing in Whimple Devon

Improving the Shine on a Terracotta Tiled Kitchen Floor in Whimple

I was contacted by a homeowner from the small village of Whimple, (Nine miles East of Exeter), about the sealer on their Terracotta kitchen tiles. The floor had only recently been cleaned and sealed by another company but the sealer left the floor looking dull and matte and she wanted a high sheen finish.

Terracotta Tiled Kitchen Floor Before Renovation Whimple

Dissatisfied with the results I was asked to strip back the Terracotta tiles again and reapply a suitable seal which would finish the tiles in a high sheen. Tile Doctor have a range of sealers for all types of floors and finish and from the brief I knew that Tile Doctor Seal and Go would be idea for this floor, it leaves a lovely sheen finish and being a water-based product, it doesn’t leave a smell as it dries.

Cleaning a Terracotta Tiled Kitchen Floor

Work started by removing the kickboards and protecting up around any skirting to protect from water ingress. Once done a strong dilution of Tile Doctor Remove & Go was sprayed onto the Terracotta tiles and left to soak in for a good 15 minutes to give it time to emulsify and break down the seal which their previous contractor had applied.

The floor was then scrubbed using a rotary machine fitted with a stiff nylon scrubbing head. This action removed the sealer into the cleaning solution and where I was able to extract from the floor using a wet vacuum. Once removed I ran a water test over the tiles to check the sealer was gone and repeated the exercise where required until I was satisfied all the sealer was gone. This is important as the new sealer may not be compatible with the original which could result in discolouration and potentially peeling off the tile later.

Remove and Go is an alkaline product so to neutralise the ph level of the floor after stripping and to further clean the tiled I gave the floor an acid wash using diluted Grout Clean-up. After a quick scrub the excess product was removed and the floor given several rinses with water, this was followed with the wet vacuum to remove as much moisture from the tiles as possible and thereby reduce the drying time.

Sealing a Terracotta Tiled Kitchen Floor

The floor was left to dry out overnight and after checking moisture levels the following day I was pleased to see it had dried and was now ready to accept a fresh sealer. Before applying Seal & Go however I decided to apply a base coat of an impregnating sealer called Colour Grow which as its name suggests will enhance the natural colour in the Terracotta.

After an hour, the Colour Grow had dried and I began building up coats of acrylic seal ‘Seal & Go’. Terracotta is quite a porous material and the floor took six coats of Seal & Go before I had achieved the right level of sheen desired by the customer.

On the customers return home they were thrilled to see the new finish was exactly what they wanted and have now set up an annual maintenance plan with me to keep the sealer topped up and floor looking the way they like it.

Terracotta Tiled Kitchen Floor After Renovation Whimple

For day-to-day cleaning I recommended Tile Doctor Neutral Tile Cleaner which is a pH neutral tile cleaning product and recommended for sealed Terracotta. It’s a mild cleaning product that won’t strip the tiles of the newly applied sealer like many strong household cleaners can. It comes in a concentrate form so a small amount goes along way.


Professional Restoration of a Terracotta Tiled Kitchen Floor in Devon

Improving the Shine on a Terracotta Tiled Kitchen Floor in Whimple Read More »

Scroll to Top