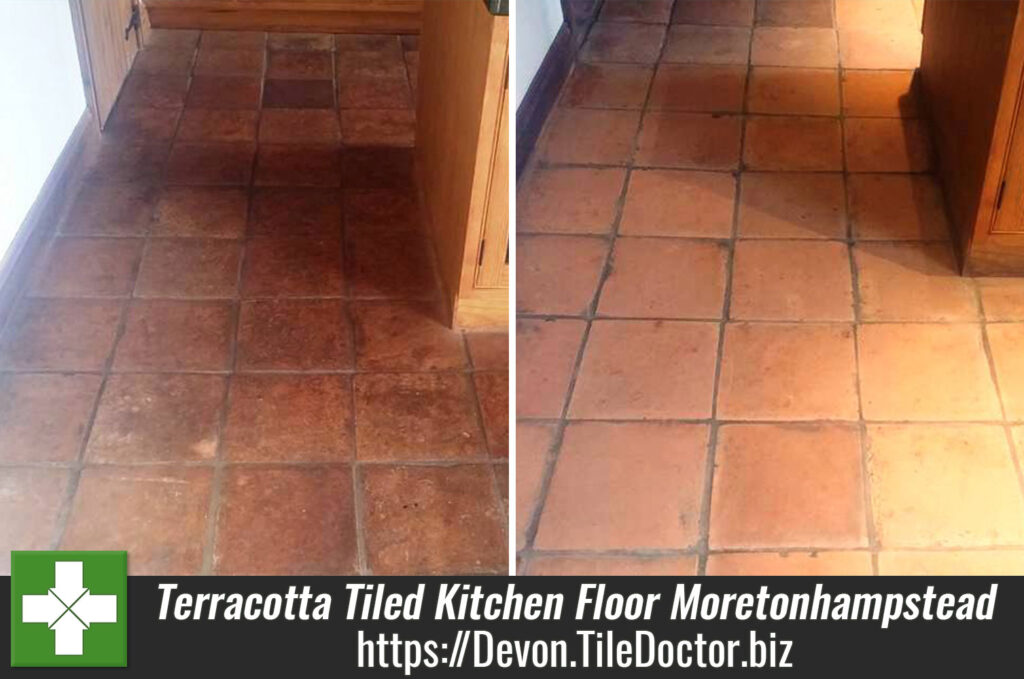
Work History

Stuart-Tomlin-Devon-Tile-Doctor

Welcome to my Work History archive where you will find detailed examples of Tile, Grout and Stone Cleaning and renovation work carried out within West Devon.

Flood Damaged Sandstone Flagstone Floor Renovated in Chagford

Flood Damaged Sandstone Flagstone Floor Renovated in Chagford

Chagford is a small town on the north-east edge of Dartmoor and so as you can expect is surrounded by plenty of old farmhouses, some still as part of a working farm, some long since converted to family homes with just a small area around the property remaining and some having made use of the land and reinvented farmland. I visited a property that falls into the latter category, having converted pastoral farmland into stables and a riding school with a family home at the centre. Whilst the owners were on holiday having a well-earned rest a pipe burst flooding the ground floor of their house, damaging the Sandstone flagstone flooring in the process.

I went over to inspect the floor and could see that the stone floor had dried out but was now dull from dirt and in addition some of the stones were now suffering from shaling. This is where the top layers of the stone start to delaminate, and the only treatment is to cut the stones back to a decent surface through a process called milling. Tile Doctor has available a set of very coarse diamond encrusted pads for this purpose which I was able to demonstrate. I carried out the demonstration on a small area so that the customers could be confident that there was a remedy and then I measured the floor so that I could work out the amount of products that would be needed and priced the job accordingly.

Flood Damaged Sandstone Tiled Floor Chagford Before Restoration
The customers were keen to go ahead with the quote and I arranged to go back and restore the floor at a mutually suitable date.

Milling Delaminated Sandstone Flagstones

On my return I prepped the skirting boards around the hallway with plastic tape to protect them from the soil generated during the milling process. Once done I started the floor treatment using a very coarse with a 50-grit diamond milling pad to cut the sandstone back and then followed with a 100, 200 and finally a 400-grit pad to get rid of any scratches caused by the coarser pads and to tighten the pores of the sandstone which would allow for easier maintenance. Water is used to lubricate the process and the floor is rinsed with more water, which is then extracted with a wet vacuum between the application of each pad.

Once this was completed and the sandstone floor was thoroughly rinsed and then dried with the wet vacuum to remove as much moisture as possible. The floor was then left to dry out thoroughly before I returned to seal. This was a large area and so the milling was done in various stages over a few days so by the time I had finished the last area the first one was nearly ready to be sealed.

Sealing Sandstone Flagstones

The customers wanted a slight sheen to the stone floor, but not too shiny and so Tile Doctor’s Seal and Go was used; this is an acrylic sealer which once fully cured will settle to a satin finish which works really well on this Sandstone. Like the cleaning the sealing was also staggered into sections to avoid the whole of the ground floor being out of action whilst the sealer dried.

Flood Damaged Sandstone Tiled Floor Chagford After Restoration
Similar to paint drying, the polymers in Seal and Go initially give the floor a semi-gloss appearance and so I warned the customer of this, reassuring them that it would dull to a satin finish over the next week or so. In fact, I called back two weeks later to check and they confirmed this had happened and they were very happy with the result.

Restoration of Water Damaged Sandstone Flagstone Flooring in Devon

Flood Damaged Sandstone Flagstone Floor Renovated in Chagford Read More »

Victorian Tiled Farmhouse Hallway Deep Cleaned in Broadclyst

Victorian Tiled Farmhouse Hallway Deep Cleaned in Broadclyst

I was contacted by the owners of an old Farmhouse in the East Devon village of Broadclyst to look at their Victorian Tiled Hallway floor which as you can see from the photograph below was heavily stained and had also been splashed with paint from decorating. Victorian tiles are very robust and can take a lot of punishment which you certainly get in a farmhouse, however once the sealer wears off dirt gets into the pores of the tile making it very difficult to clean.

I visited the property to take a closer look and to take some moisture readings because these old floors don’t have a Damp Proof Course and moisture levels too high can restrict when this type of work can be done due to the sealers needing the floor to be dry in order to cure. I also did a test piece to show the customers what level of cleaning could be achieved.

Victorian Tiled Hallway Broadclyst Farmhouse before cleaning

Cleaning a Victorian Tiled Hallway

With the customers happy with the quote I returned to complete the work starting by covered the skirting and bottom of the stairs to protect the paintwork and carpet. I then put a strong stripper/degreaser called Pro Clean on to the floor, ensuring even coverage and keeping and eye on the floor to make sure that it didn’t dry out.

After a short dwell time I set to work scrubbing the floor with a 400 grit diamond burnishing pad and using small hand blocks to get into the corners and any edges not reached by my machine. Once I was satisfied that the tiles were as good as they could be I rinsed the floor to remove the alkaline cleaner and soiled water.

This was followed by giving the floor an Acid rinse using Tile Doctor’s Acid Gel, this process counteracts any alkaline salts that can rise up through the tile as it dries out, a process which is more commonly known as efflorescence. This can be quite a problem on floors like this that don’t have a damp proof course (floors generally didn’t pre-1950s). I had to be careful not to leave the acid down for too long because these tiles are susceptible to acid damage.

Dealing with salt issues on these old floors (efflorescence) is essential because they can damage the sealer or become trapped under it, detracting from the beauty of the floor. Given the age of the farmhouse it’s difficult to know what the floor had been laid onto. Often it was compacted rubble and building works from the erection of the adjoining buildings; additionally some of the later Victorian floors were laid on a wet limecrete scree which contain a high salt-content.

Before I left for the day I left an air mover on the floor to aid in the drying of the tiles. If there are radiators in the area I also suggest that they are turned on overnight to further aid the drying process. Occasionally these types of floors need to be left for several days to dry but it is worth the wait and the floors can be used in the meantime provided indoor shoes and socks only are used and care is taken not to get the floor dirty.

Sealing an Old Victorian Tiled Hallway

Upon returning the next day I tested the moisture content of the floor and was pleased to find that it was well within acceptable levels for the application of the sealer that I was planning to use. I quickly checked the floor for areas that I felt may be able to be improved and once satisfied a single coat of matt-finish, colour-enhancing sealer called Colour Grow was applied before two coats of a Seal and Go sealer was used to give the floor a satin finish, which I think gives it a slight glaze and freshly mopped appearance.

Victorian Tiled Hallway Broadclyst Farmhouse before cleaning
The customers were thrilled and said that they wished they had brought me in sooner!

Professional Deep Clean and Seal of a Victorian Tiled Hallway in East Devon

Victorian Tiled Farmhouse Hallway Deep Cleaned in Broadclyst Read More »

Quarry Tiled Kitchen Floor Deep Cleaned in South Molton Georgian Townhouse

Quarry Tiled Kitchen Floor Deep Cleaned in South Molton Georgian Townhouse

This story follows on from a previous post on the renovation of a Victorian Tiled Reception Area at a listed Georgian Townhouse in the middle of the small market town of South Moulton in North Devon. You may recall he was struggling to clean the floor in the reception area and I was called in to sort it out. Whilst I was there he also asked me to deep clean and seal the Kitchen Quarry Tiles.

Kitchens as you can imagine are one of the busiest areas in any house and as a result the floors do see a fair amount of wear; in this case the Quarry tiles were dull and lifeless and I suspect any previous sealer had long since worn off.

Quarry Tiled Kitchen Floor Before Cleaning South Molton

Cleaning Kitchen Quarry Tiles

The Quarry tiles were in a better state than the Victorian tiles I discussed in the previous post so a less aggressive course of action was required. In this case I applied a strong dilution of Tile Doctor Pro-Clean and left it to soak in. Pro-Clean is an effective tile cleaner which will clean and strip off old sealers in a strong dilution. This was important as I wanted to be sure any remaining sealer would be removed, typically sealers wear off in the high use floor areas first so it was quite possible some sealer would still be present on the less used parts of the floor.

After ten minutes I agitated the solution with a black scrubbing pad fitted to a rotary scrubbing machine to really get the floor clean and then rinsed off the soiled cleaning solution with water and a wet and dry vacuum before leaving it overnight to dry off fully.

Sealing Kitchen Quarry Tiles

The following day I returned and after rechecking the moisture levels to ensure that they had adequately dried out I started to seal the Quarry tiles in the Kitchen using Six coats of Tile Doctor Seal and Go which leaves a satin finish once dried and gives the tiles a freshly mopped or slightly glazed look.

Quarry Tiled Kitchen Floor After Cleaning South Molton
The customer was thrilled and left the following feedback on the Tile Doctor feedback system:

“The work was carried out in a professional manner, with excellent results.”

For aftercare I left the customer with some guidance on care and maintenance of the floor as well as a suitable bottle of tile cleaner.

Professional Renovation of a Quarry Tiled Kitchen Floor in Devon

Quarry Tiled Kitchen Floor Deep Cleaned in South Molton Georgian Townhouse Read More »

Victorian Tiled Reception Area Renovated in South Molton Listed Building

Victorian Tiled Reception Area Renovated in South Molton Listed Building

I was approached by the owner of a listed Georgian Townhouse right in the middle of the small market town of South Moulton in North Devon who was struggling to have any impact on the appearance of his Victorian tiled reception area, despite hours of back-breaking scrubbing and had become disheartened by it.

Georgian Reception Floor Tiles Before Cleaning South Molton
Upon arrival a survey on the floor was conducted where I tested the moisture level of the tiles because floors of this age and construction didn’t have a Damp Proof Course and as such were just tiled onto whatever subsurface was already there, which quite often contained rubble and other guiding materials such as lime from the construction of neighbouring properties!

Georgian Reception Floor Tiles Before Cleaning South Molton
Whilst talking to the customer he mentioned that he had some old quarry tiles in his kitchen that he also wanted cleaning, however I’ll cover that in another post. To continue I produced a quote for the work which was accepted and a date was agreed for me to return with all the equipment and products required.

Cleaning Victorian Tiled Reception Area

To clean the Victorian tiles in the reception area I applied a medium dilution of Tile Doctor Pro-Clean and left it to soak in for ten minutes. I then set about scrubbing the solution into the tiles using a series of Diamond impregnated burnishing pads ranging from 100-400 grit.

Once the whole floor had been treated in this manner it was thoroughly rinsed with water using a wet and dry vacuum to extract the now soiled cleaning solution and I was able to see that the process had really brought the tiles up a treat.

Concerned about the damp readings I had experienced earlier I decided it would be prudent to give the floor an Acid Rinse with Grout Clean-up to counteract any potential salt issues (efflorescence) that can be a real problem on these old floors which have no Damp Proof Course. I highly recommend this step on old floors as salts can over time permeate through the tiles and the cleaning process draws them to the surface. Left unaddressed the salts can damage the sealer and leave the floor looking far from its best.

Once the tiles had been cleaned, I rinsed the entire floor thoroughly using fresh water to remove any trace of cleaning products, before leaving it to dry off completely overnight.

Sealing an Original Victorian Tiled Hallway and Entrance Lobby

The following day I returned and after rechecking the moisture levels to ensure that they had adequately dried out I started to seal the Victorian tiles in the reception area. To improve colour, I first applied a coat of Tile Doctor’s Colour Grow, a solvent based impregnating sealer which picks out and enhances the natural colour of the tiles, not only bringing the whole floor to life but helping to disguise any damage the floor has suffered over the years. After this coat had dried sufficiency four coats of Seal and Go were applied to finish off the floor and give it that ‘wow factor’.

Georgian Reception Floor Tiles After Cleaning South Molton Georgian Reception Floor Tiles After Cleaning South Molton

The customer was thrilled and left the following feedback on the Tile Doctor feedback system:

“The work was carried out in a professional manner, with excellent results.”

For aftercare I left the customer with some guidance on care and maintenance of the floor as well as a suitable bottle of tile cleaner.

Professional Renovation of a Victorian Tiled Reception Floor in Devon

Victorian Tiled Reception Area Renovated in South Molton Listed Building Read More »

Original Victorian Tiles Restored at B&B in Bude

Original Victorian Tiles Restored at B&B in Bude

Bude is a lovely coastal resort in North Cornwall and is home to several B&Bs for visitors to the area. It became popular during the latter half of Queen Victoria’s reign, as sea bathing became a popular trend amongst the upper and middle classes, and as a result there are plenty of period houses.

In fact, I was recently contacted by a lucky Bed and Breakfast owner who had uncovered this late Victorian tiled hallway and entrance lobby which was around a hundred years old during renovation work. It had been under carpet for at least twenty years and had a variety of stains including paint, tar and glue!

The customer rightly wanted to reinstate it as a showpiece to greet clients upon entering the upmarket guesthouse but had no luck trying to remove stains themselves and had spent many hours on hands and knees but to no avail and were nearly ready to take the builder’s advice and cover it in a self-levelling cement and install a carpet throughout which would have been sacrilege!

Victorian Tiled Hallway Before Restoration at Bude Bed and Breakfast

Cleaning an Original Victorian Tiled Hallway and Entrance Lobby

To begin with diamond-impregnated buffing pads were used with a rotary machine to scrub the floor and open up the pores. Small diamond hand blocks were also used to get into those difficult to reach areas such as corners and under the stairs.

Afterwards the floor was thoroughly rinsed with water which was then extracted using a wet vacuum. This was followed by giving the floor an Acid rinse using Tile Doctor’s Acid Gel. This helped to remove old mineral deposits and residue from carpet underlay. I had to be careful not to leave the acid down for too long because these tiles are susceptible to acid damage. This is also a great product to use as par for the course on floors like this that don’t have a damp proof course (floors generally didn’t pre-1950s) and the acid will neutralise any salts coming rising up through the tile later.

Dealing with salt issues on these old floors (efflorescence) is essential because they can damage the sealer or become trapped under it, detracting from the beauty of the floor. Given the age of the house It’s difficult to know what the floor had been laid onto. Often it was compacted rubble and building works from the erection of the adjoining houses. Terraced and some of the later Victorian floors were laid on a wet limecrete scree which contain a high salt-content.

Sealing an Original Victorian Tiled Hallway and Entrance Lobby

Once the tiles had been cleaned, I rinsed the entire floor thoroughly using fresh water to remove any traces of chemicals, before leaving it to dry completely overnight.

Upon my return to the B&B the next day, I sealed the tiles using several coats of Tile Doctor Colour Grow, an impregnating sealer which provides robust protection and intensifies the natural colours in the tile. It does this while leaving a natural-look matte finish which is befitting of a classic Victorian geometric patterned floor like this one.

Now cleaned and freshly sealed, the Victorian tiles will be in a much strong position to cope with the busy B&B season over the Summer. The owner was very pleased and I’m sure visitors to the B&B will be very impressed with this original feature!

Victorian Tiled Hallway After Restoration at Bude Bed and Breakfast
As part of the package a cleaning and maintenance guide is provided once the work has been completed but unfortunately the owner’s uncle didn’t consult this when house-sitting and attempted to clean the floor with white spirit. Fortunately, I was able to return and improve the damage that was caused much to the owner’s relief and just in time for opening!

Professional Restoration of an Original Geometric Victorian Tiled Hallway at a Bude B&B

Original Victorian Tiles Restored at B&B in Bude Read More »

Cleaning a 40m2 Light-Limestone Kitchen Floor at a Cottage in Ashprington

Cleaning a 40m2 Light-Limestone Kitchen Floor at a Cottage in Ashprington

Ashprington is a small, picturesque village just outside of Totnes and boasts a quaint stream running through the centre of the village, several listed cottages and a pub, ‘The Watermans Arms’, which offers good food – including their now famous triple-fried chips!

I was approached by the owners of one of the beautiful listed cottages in the village, which had the river running through the garden and was a stone’s throw from the pub, because they had extensively developed the building around five years ago. This work included the installation of a lovely light-limestone floor spanning the kitchen and open-plan extension, however the floor was starting to lose its natural appeal and the owners were finding it harder to clean.

With summer fast approaching the owners were keen to get the property ready for their annual holiday and a visit was quickly arranged. I took a closer look at the floor and conducted a test on a small area to give the clients an idea of what to expect. The limestone was honed smooth but was not polished and the customers were keen not to add too much of an unnatural shine to the floor.

The grout lines in some of the more heavily used areas, such as by the sink, were also discoloured and would require a decent scrub with an appropriate Tile Doctor product.

Light Limestone Kitchen Floor Ashprington Before
I spoke to the clients about options for the finish to be applied after cleaning and they decided that they wanted to keep the tiles as light as possible with a slight shine. With the clients impressed with the test area I prepared I went away and produced a detailed quote which was sent to them along with our general T&Cs and the work was booked in to be completed shortly after.

Cleaning a Light-Limestone Tiled Kitchen Floor

The floor spanned quite a large area, some 40m2, and had some larger items of furniture that needed to be moved before starting. Because the house was empty at the time it was a straightforward task to divide the area into two and stagger the work over four days so that the furniture could be moved to suit.

The first task was to scrub the grout with a specialist grout brush, designed to get right into the grout lines and work the product in. Limestone is an acid-sensitive stone so a strong alkaline cleaner called Remove & Go was used which was then allowed to dwell for around 45 minutes to work its magic. The area was quickly rinsed before using a series of diamond impregnated burnishing pads attached to a rotary scrubbing machine, ranging from a coarse 400 grit (200 in some of the more stubborn areas) up to a fine 1500 grit to clean the stone. The whole area was then rinsed using a truck-mounted system that feeds pressurised water to the floor whilst extracting the dirty water at the same time. A rotary spinner tool was also used which helps to get a really thorough rinse. The first area was then left to dry overnight, aided by the underfloor heating which was installed with the tiles.

Polishing a Light-Limestone Tiled Kitchen Floor

The following day a very fine 3000 grit diamond pad was used to ‘spray burnish’ the floor which uses very little water and ensures that any remaining residues are lifted as well as finishing the floor in the highest level of mechanical polishing possible prior to sealing.

If the clients desired a higher level of shine a powdered high shine sealer would have been worked into the tiles to achieve a highly reflective surface, however the mechanical polish was the highest level of shine wanted.

Sealing a Light-Limestone Tiled Kitchen Floor

My client has requested a completely natural finish so to seal the stone after cleaning I applied an impregnating sealer called Tile Doctor Ultra Seal. Impregnating sealers soak into the pores of the tile protecting them from within and Ultra-Seal doesn’t alter the appearance of the floor and so maintained the natural appearance of the stone keeping it as light as possible.

Light Limestone Kitchen Floor Ashprington After
The following day the furniture was carefully moved to the recently sealed area and the whole process was repeated for the second area. Aftercare instructions and a bottle of suitable pH-neutral cleaner were supplied.

The customer was thrilled with the final result and was surprised at the transformation of the floor and left me the following feedback:

“Great service, and the floor looks new again.”
Elaine M, Ashprington

Professional Renovation of a Light Limestone Floor in Devon

Cleaning a 40m2 Light-Limestone Kitchen Floor at a Cottage in Ashprington Read More »

Original Herringbone Pattern Edwardian Tiles Restored in Colyton

Original Herringbone Pattern Edwardian Tiles Restored in Colyton

Colyton is a small village in the Coly Valley, which itself is part of Devon’s Area of Outstanding Beauty. As you can imagine, it was very nice to drive through the countryside to reach the village to visit a customer. The customer was keen to restore her Edwardian tiled entranceway and hallway in a classic herringbone pattern, which consists of an arrangement of rectangles.

Parts of the floor had been under carpet for a long time and other areas were covered in at least three layers of thick masonry paint. There was some damage to the floor at thresholds where the carpet grips had been hammered into the floor and a few holes with rawl plugs in scattered the area. This had left the floor looking worse for wear and all in all, there was a lot to be done to restore the tiles back to their original condition – just take a look at the photos below.

Edwardian Hallway Tiles Herringbone Pattern Colyton Before Edwardian Hallway Tiles Herringbone Pattern Colyton Before

Several methods were tried on each area during the initial visit to determine the best way forward including chemicals, diamond pads and heat plus a razor scraper. It was clear a mixture of these methods would be needed to get the best results.

Cleaning an Edwardian Tiled Entranceway and Hallway

On my return, I removed the rawl plugs filled the holes with an epoxy resin in a matching colour. Next I started on giving the tiles a deep and thorough clean to remove not just the copious ingrained dirt, but also the unappealing paint smears.

I did this by applying Tile Doctor Remove and Go, which not only cleans the stone, but also strips away any old sealer. Remove and Go is particularly good for removing most artificial coatings and finishes, adhesives, and paints – and can be used on most unpolished natural stone.

Next, I give the tile and grout an acid rinse with Tile Doctor Grout Clean Up, which is a concentrated phosphoric acid product, to negate any underlying efflorescence and alkaline salt deposits. Efflorescence and salt deposits can be common problems for older, original tiled floors because they often lack a damp proof course.

Having finished cleaning the floor, I gave it a thorough rinse using fresh water to remove any traces of chemicals, before leaving it to dry overnight.

Sealing an Edwardian Tiled Entranceway and Hallway

Returning to the property next day, I ran some quick damp tests to check the floor was ready to be sealed.

To seal the floor, I used a single coat of an impregnating sealer called Colour Grow and followed this up with five coats of Tile Doctor Seal and Go. Both sealers will allow for vapour to rise up through the floor ensuring any damp can rise up through the floor in future which is essential for an old floor like this one which has no damp proof membrane.
The also combine to provide stain resistance surface and a robust, low-sheen finish.

And, with that, the job was done. Two days of work later and the floor is back to looking it best, as you can see in the photos below. Another satisfied client for the Devon Tile Doctor who left the following feedback.

“Very good work,we are very pleased with the result.
Stuart was a very professional hard worker and gave us clear advice on taking care of the floor.“

Edwardian Hallway Tiles Herringbone Pattern Colyton After Edwardian Hallway Tiles Herringbone Pattern Colyton After


Professional Tile Cleaning and Sealing for a Herringbone Pattern Edwardian Tiled Entranceway and Hallway Restoration in Colyton

Original Herringbone Pattern Edwardian Tiles Restored in Colyton Read More »

Old Reclaimed Slate Flagstone Floor Rejuvenated in Dawlish

Old Reclaimed Slate Flagstone Floor Rejuvenated in Dawlish

These lovely old Slate flagstones were reclaimed form an old waterworks in Exeter about twenty years ago and had been laid in an old fisherman cottage in Dawlish during a sympathetic renovation, replacing an old floor that had been laid in the 1970s (which have a lot to answer for with old houses!). The flagstones really looked the part and were larger and thicker than usually available on the market new. Other than being dirty and a pain to clean because of the dogs living in the house, around the edges of some of the larger tiles there was some sort of fluorescent orange residue which was up to 10mm thick in places and as hard as the stone it was adhered to.

Dawlish is a lovely little fishing harbour village on the South-East Cornwall coast with lots of interesting history. For hundreds of years the practice of smuggling imported goods prospered in the area thanks to its convenient harbour. The village is home to only around 5,000 inhabitants.

As you can see from the photo below, the tiles – along with the grout lines – were very dirty and stained. No wonder the property owner was beginning to give up on salvaging them! However, I assured the customer that with the right cleaning products and techniques, I could make a significant improvement to the condition of the floor.

Slate Flagstones Before Cleaning in Dawlish

Burnishing and Cleaning Old Slate Flagstones

To tackle the orange residue staining I used a grout removal tool which allowed the natural texture of the stone to remain rather than smoothing off the whole edge.

The dirt and staining in the slate flagstones however was so deeply ingrained I felt it best to strip back the affected layer of stone using a process known as burnishing. This involves the application of diamond encrusted burnishing pads to the floor, effectively grinding away the muck to reveal a cleaner surface beneath. When dealing with polished stone such as Limestone, Marble and Travertine, we will normally use a system of four burnishing pads – each with a different level of grit – to gradually restore the shine to the tiles.

However, in the case of these rustic, unpolished Slate Flagstones, I opted only to use only the Coarse and Medium grit burnishing pads to cut back the affected layer of stone, leaving a surface that could subsequently be scrubbed using Tile Doctor Remove and Go. This is a multi-purpose product that strips away any old sealer, adhesive marks and paint stains, while also cleaning the stone and grout.

This process ensured all traces of old sealer were removed and that the whole floor was left fresh and clean. The resulting soiled solution was extracted from the floor using a wet vacuum and the whole area rinsed with fresh water to remove any traces of cleaning product. To end the first day of work, the floor was left to dry overnight.

The village the cottage is situated in is very isolated to traffic; there is a car park at the top of the town and the only option is to walk the nearly half a mile each way to the cottage on the harbour so streamlining the kit used was a necessity! In the end two trips each way go the kit required there and back with the biggest machines being a wet vac and a rotary scrubber.

Sealing Old Slate Flagstones

Returning to the property the next day, I ran some damp tests to check if the floor was dry and ready to be sealed. This is particularly important in older properties like this, as it’s quite likely that there is no damp proof course present and moisture issues are far from uncommon.

Thankfully, the tiles proved dry and I could seal them using Tile Doctor Colour Grow. This impregnating, colour-enhancing sealer provides a robust seal, as well as a natural-look matte finish which really matches the character of these original Flagstones. It also really lifted the natural shades in the stone.

Slate Flagstones After Cleaning in Dawlish
The customer was ecstatic with the result. To make sure the floor can be kept looking great for many years to come, I recommended that the customer clean it regularly using a product called Tile Doctor Stone Soap. It’s specially formulated for the routine maintenance of natural stone floors; not only will it clean the floor very well, it will also continue to add to the natural patina of the stone.

Professional Restoration of an Old Slate Flagstone Tiled Floor Devon

Old Reclaimed Slate Flagstone Floor Rejuvenated in Dawlish Read More »

Restoring Neglected Geometric Victorian Hallway Tiles in Barnstaple

Restoring Neglected Geometric Victorian Hallway Tiles in Barnstaple

Barnstaple in North Devon is known to be one of, if not the oldest boroughs in the whole of the United Kingdom. The area certainly has a rich history and many of the properties built in the 19th century still exist and are in use.

It’s not uncommon for the owners of houses built in this era to discover original Victorian tiled floors and hallways. They’ve usually been covered up at some point in the past, either by carpet or linoleum, but if maintained correctly they can be a real asset to any property.

I recently visited one such customer, who lives in Barnstaple, to restore a recently uncovered Victorian tiled hallway that had been tiled in a geometric pattern. This hallway had been neglected and covered for some time by carpet so the colours had faded and there were patches of carpet underlay firmly embedded in some of the tiles.

The property owner uncovered the floor after seeing a similar one in the entrance hallway of a neighbour and was thrilled with her find. After a bit of scrubbing and cleaning the customer decided to call in professional help after a recommendation for the Tile Doctor Devon from a friend. A home visit was conducted and a test patch was done to show what was possible and to talk through options. A quote was then produced which the customer was happy with and the work was arranged for the following week.

Victorian Tiled Hallway Barnstaple before restoration

Cleaning a Neglected Victorian Tiled Hallway

As the floor was really in quite a bad state, I opted to use Tile Doctor NanoTech HBU as my main cleaning product. HBU stands for ‘Heavy Build-Up’ – and that’s exactly what the product is formulated to tackle: heavy build-up of ingrained dirt and soil. It used nano-sized cleaning particles to penetrate deep into the pores of the stone and get underneath stains to lift them to the surface.

I applied NanoTech HBU to the entire hallway and left it to dwell for several hours, before scrubbing it as thoroughly as possible with a brush fitted to a rotary cleaning machine. The soil that was brought to the surface was subsequently rinsed away with fresh water and the resulting slurry was extracted using a wet vacuum.

Sealing a Victorian Tiled Hallway

Once finished with the cleaning process, I left the floor to dry out completely. This was important as older floors which lack a damp proof membrane can suffer from moisture issues, and these issues can damage the performance of the sealer.

Thankfully there were no problems with drying the floor. I was able to seal the tiles using a colour-enhancing impregnating sealer from our range, known as Tile Doctor Colour Grow. For extra protection – and to provide the finish the customer had requested – I also applied a topical sealer called Tile Doctor Seal and Go. This left the floor with a high-quality, long-lasting satin finish.

A properly sealed floor will be much more resistant to stain as well as easier to clean. As with every job a cleaning and maintenance guide was provided which gives handy tips and do’s and don’ts for the floor and that particular sealer.

The restoration reinstated this great Victorian tiled hallway as the showpiece upon entering the property and the customer was absolutely thrilled. You can see the final result below.

Victorian Tiled Hallway Barnstaple after restoration
The customer was thrilled with the floor and was very surprised at just how well the colour came back to the tiles and provided the following feedback:

“I am so pleased with the service Stuart provided. After the initial quote and patch test I felt under no pressure to ask him to proceed, but I was happy with the quote and he arranged a date convenient to me. I am chuffed with my floor, it looks great. The after care has been great also. Thank you Stuart.”

Professional Restoration of a Dirty and Neglected Victorian Tiled Hallway in North Devon

Restoring Neglected Geometric Victorian Hallway Tiles in Barnstaple Read More »

Centuries Old Limestone Flagstones Resurfaced and Restored in South Milton

Centuries Old Limestone Flagstones Resurfaced and Restored in South Milton

South Milton is a small, but very old town of about 400 inhabitants in South Devon. The village has been there for at least 1,000 years and is known for the nearby National Trust beach area of South Milton Sands.

I recently visited the area to visited a customer who had discovered a Limestone tiled floor that had been hidden under carpet for around twenty years. The floor was several centuries old – as is the property itself – and it was suffering from a problem known as flaking or shaling, which is when the top layer of the stone starts to flake off.

The customer had already made the decision to remove the carpet and underlay because they wanted to reinstate some character and original features to their dining room! The floor was very dry and dusty and had the imprint of the underlay firmly embedded in some areas. As a result, the floor appeared cracked and damaged (see the photo below) and was in dire need of restoration.

A test was conducted using both chemicals and diamond-enhanced abrasive pads to ascertain the most appropriate restoration method; although the diamond pads are the only real option to address the shaling the chemicals could have also been used in the cleaning of the floor. The test showed that the diamond pads were the most effective solution for the floor and a quote was produced which as accepted.

Limestone Flagstone South Molton before cleaning

Milling a Damaged Limestone Tiled Floor

With the state the floor was in, I needed to use a process called milling, which involves using Very Coarse diamond encrusted pads fitted to a heavy rotary scrubbing machine to cut back the damaged layer of stone to unveil a fresh surface. The floor was suffering from mild lippage and undulation problems, and the milling would be able to resolve these problems too.

Lippage occurs when the surface of the floor becomes uneven and the tiles are not level with one another, and this can be quite hazardous. Undulation is when the floor gets a wave-like appearance.

After cutting the floor back with a 50 and 100 grit coarse milling pads to expose the new surface, I gradually smoothed the surface with finer pads up to 400 grit to close the pores in the stone.

The floor was then given a thorough rinse which ensured it was clear of all dirt and soil that had been generated, even the imprint from the underlay had been effectively removed.

Sealing a Limestone Tiled Floor

After cleaning the floor was left to dry for two days to ensure it would be fully dry before our return to seal the floor. To seal I used a colour-enhancing sealer called Colour Grow which impregnates into the pores of the stone, lifting the colours and protecting the stone from within. Colour Grow is suitable for use on a variety of natural stone, including Flagstones, Flamed Granite, Limestone, Marble, Quarry Tile, Sandstone, Slate, Travertine as well as Victorian tiles.

You can see the complete transformation of the Limestone tiled floor in the photo below.

Limestone Flagstone South Molton after cleaning
The difference made is quite remarkable! The customer had believed the tiles to be unsalvageable, and so she was over the moon with the outcome.

Professional Restoration of a Damaged Limestone Flagstone Floor in Devon

Centuries Old Limestone Flagstones Resurfaced and Restored in South Milton Read More »

Scroll to Top